Advertisement 300 X 250

Girls' Best Friend

Bright and sparkly. Gemstones came to my mind when I was removing this Dragon Fruit and Orange jelly from the mould. Like a combination of gemstones...rubies, amber and diamonds, all in one!

Dragon's Eyes

The literal translation for the name of a small brown, juicy exotic fruit from the lands of Asia, known as Longan in Chinese, packed into these muffins

Nostalgia

A taste from the humble beginnings, the Long Bean Rice brings back beautiful memories of the yesteryears

Light and Fluffy

Lemon, Yogurt and Cranberries~a nice blend of flavours in a light and fluffy chiffon cake

Bread Stories

Asian style buns ~ Popular as breakfast food or snack, sweet/savoury fillings wrapped in soft, cottony bread

Wednesday, 10 August 2011

The Dragon and the Fish


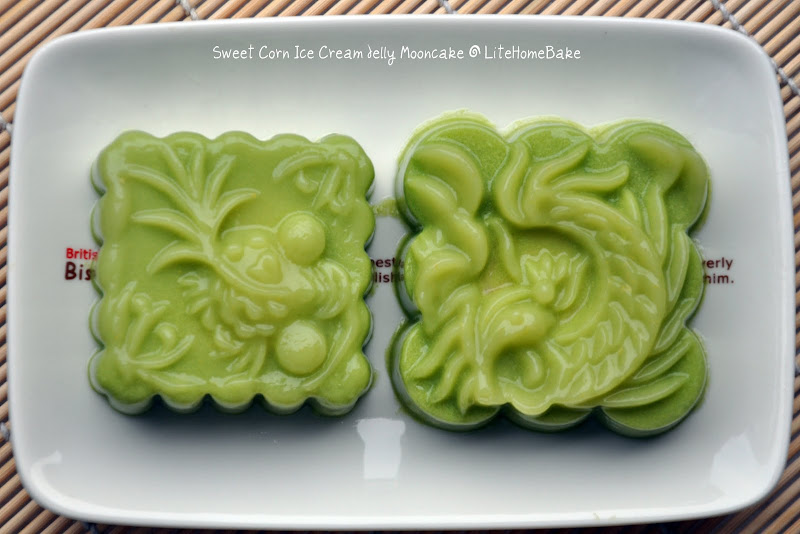
In comes the dragon and the fish. These jelly mooncake moulds come in many shapes and designs and the dragon and the fish being auspicious animals for the Chinese, are not left out. The dragon symbolizes prosperity and longevity while the fish with a pronunciation similar to the Chinese character for abundance symbolizes wishes for everything in abundance (wealth, health etc, etc).

Dragon and fish in another flavour of jelly mooncakes, you will be reading at least 4 of this kind. I need 4 to fit prettily in a gift box :) This is the second one after the red dragon fruit. Sweet corn with pandan. Colourful, in shapes of auspicious symbols and different flavours, these make wonderful gifts for the festival. It's more difficult to create the color impact with baked ones, might be achievable with snow skin though. I now have red and green in the box, 2 more colors to go, a jade like one and gold brown perhaps for more prosperity :)


This is also a new recipe that i tried this year. Last year I had a green one coming from green tea and soy milk. This one has sweet corn for the filling and the skin is pandan infused coconut milk. Oh, with some ice-cream added to it too! Maybe green tea should stay as the choice for elders :)

Recipe
Source :Adapted from Mooncake Selections by Khoo See Yew
Makes : Approximately 5 pieces (with similar moulds)

Ingredients for Filling
  • 15g gm. caster sugar
  • 1 tsp agar-agar powder
  • 60 thin coconut milk
  • 75g sweet corn (cream style)
  • 60ml thick coconut milk
  • 25g sweet corn ice cream
  1. Boil sugar, agar-agar powder and thin coconut milk in a pot until agar agar and sugar dissolves.
  2. Lower flame and mix in sweet corn (cream and ice-cream) and thick coconut milk. Stir until ice-cream dissolves.
  3. Pour in small bowls and let it set.
  4. Remove from bowl, use a fork to scratch surface (top and bottom). This is to make sure the filling and skin will stick to one another.

Ingredients for Skin
  • 50g sugar
  • 3 tsp agar-agar powder
  • 350ml thin coconut milk (See Note)
  • 100ml thick coconut milk
  • 1/4 tsp salt
  • 40g sweet corn ice-cream
Note to get 350ml thin coconut milk
Blend 6 pieces of pandan leaves with 300ml water, sieve through and add 50ml coconut cream to form 350ml thin coconut milk (Add water if insufficient)
  1. Boil sugar, agar-agar powder and thin coconut milk in a pot until agar agar and sugar dissolves.
  2. Lower flame and mix in sweet corn ice-cream, salt and thick coconut milk.

Assemble
  1. Pour in some skin agar agar into mooncake mould.
  2. When it is half set, put in the filling then pour the balance skin mixture into the mould until full. Let it set.
  3. Chill in the fridge before serving.

Tuesday, 9 August 2011

Red Dragon Fruit Jelly Mooncakes


A third type of mooncakes, more of a lookalike than the real thing. Totally different ingredients and as a result, different texture and taste all together. Made from jelly, both skin and fillings, so basically, it tastes jelly. Not sure how and when it came about, some say it's the healthier version of the mooncake. True in some way, but we only eat mooncakes once a year, why refrain and eat lookalikes?? I say, indulge in both, real and lookalikes!

This one had red dragon fruit for the skin, which is actually one of the flavour that I make quite often for jellies. I like the refreshing taste and the bright color. The only difference is to make it a mooncake lookalike, it has another layer of jelly within. Most of the time, a flavour that is able to complement the skin both in terms of taste and color will be the chosen candidate for the filling, feels like playing matchmaking :) Last year, my dragon fruit jelly mooncakes had black sesame fillings, this time, I thought why not give him a new companion? I went without the black sesame seeds and used milk instead of coconut milk. The change was made mainly because I wanted to see if the red & white color combination is prettier than red & black.

Taste wise I think black sesame is more distinctive. Color wise, i think they are equally pretty.

Recipe
Source :Adapted from Mooncake Selections by Khoo See Yew

Ingredients for Filling
  • 25 gm. caster sugar
  • 1 1/2 tsp agar-agar powder
  • 125 ml water
  • 70 ml fresh milk
  • 55 ml evaporated milk
  1. Boil sugar, agar-agar powder and water in a pot until agar agar and sugar dissolves.
  2. Lower flame and mix in milk.
  3. Pour in small bowls and let it set.
  4. Remove from bowl, use a fork to scratch surface (top and bottom). This is to make sure the filling and skin will stick to one another.

Ingredients for Skin
  • 100 gm. sugar
  • 4 tsp. agar-agar powder
  • 600 ml water
  • 150 gm red dragon fruit (blended)
  • Few pieces pandan leaves
  1. Boil sugar, agar-agar powder and water with pandan leaves in a pot until agar agar and sugar dissolves.
  2. Lower flame and mix in blended dragon fruit.

Assemble

  1. Pour in some skin agar agar into mooncake mould (If a see-through effect is preferred (i.e. can see the filling), lessen the amount put in).
  2. When it is half set, put in the filling then pour the balance skin mixture into the mould until full. Let it set.
  3. Chill in the fridge before serving.

Thursday, 4 August 2011

Snow Skin Mooncakes


More mooncakes :) A batch of what is known as snow skin ones. These are meant to be eaten chilled, i think that's where it got it's name from although technically, the direct translation from Chinese should be ice, somehow snow has a more sophisticated feel, i guess.

They are made from cooked glutinous rice flour. Some say this is the easiest version of mooncakes. I agree to certain extend, if you are able to get cooked glutinous rice flour, all it needs is to make the flour into a dough before wrapping it with some fillings. Put it into a mooncake mould, press it in, give it a bang and out plops your snow skin mooncake! If are unable to get cooked glutinous rice flour, you have to cook the uncooked flour yourself, by frying it or using a microwave to do it. I used boiled pandan water to get the fragrance and color for the skin. This can be substituted with any other flavour preferred. The skin actually has a texture identical to the Japanese Mochi.

As for the fillings, I split between mixture of lotus-red bean and durian lotus. Yes, had to make some with the stinky stuff :) No doubt, the durian lovers in the family loved those with durian paste. Stinky and creamy! As for the mixture of lotus and red beans, it blended quite well, maybe we are quite familiar with them as mooncake fillings, besides it gave a multi-color layer effect.

Yes, there will be more to come!

Monday, 1 August 2011

Is it time already?


Mooncakes have started to flood the market. Is it time to savour them already?? In fact it's still 1 1/2 months away. This year, Mid-Autumn festival falls on 12 September.

We have the commercial sidelines to thank for giving us a hand in piling up the pounds by bringing them out so early. Coming out with so many new flavours each year, isn't much help too. I guess it's a case of early bird gets the worm for them. I once read that the mooncake festival is the most lucrative of all chinese festivals in our country, with some only in business at this time of the year. By the price of mooncakes these days, it's no brainers. Based on the price list that I have managed to scan through (bakery/restaurant standards) the past few days, it starts at RM50 per box of 4 this year. Unfortunately, it's moving up very steadily and mind you in a pretty steep way too.

Might as well as make my own, making mooncakes are not too difficult. Homemade ones make better gifts too. Although mine may not be so perfect looking, I am sure loved ones and friends will agree that it's the thought the counts, right??

I started off with the traditional baked mooncakes this year. Cheated by making some with store bought red bean paste to kick-off the mooncake making spree :)


The cheat red-bean paste filling mooncake :)


Next came the mixed nuts and fruits, this one genuine homemade fillings. I packed them with assortment of nuts (almond, pistachio, hazel, pecan, seeds (melon, pumpkin, sesame) ) and assortment of dried fruits (kumquat, winter melon, ginger, nutmeg, cranberries, blueberries, mango, coconut, pineapple) This were made for my folks who loved this flavour and they loved mine!

There will be more coming for sure. Different skin, different fillings! Oh, I am so excited!

Friday, 29 July 2011

Finally...One Humble Roll


Visits to Aspiring Bakers posts (a collection of creations based on a theme) have always been literally jaw-dropping! I am completely bowled over by the level of mastery and creativity displayed by fellow bloggers. Although I would very much like to join in the fun, I never gathered enough courage to make the step with my novice skills. I promised myself, I will give it an attempt the next one...and here I am after many next ones :)

I contemplated if I should skip this one and wait for the next one as the theme for this month , Swiss Rolls is one huge challenge for me! More so when I saw rolls and rolls of amazingly beautiful swiss rolls that came rolling in as fellow bloggers continue to post them in conjunction with the theme. Eye-opener indeed, never occurred to me that swiss rolls could be made that way!

My first attempt on the Swiss Roll was some time back, at the very early stages of my baking journey. I thought it sounded fairly easy. It turned out to be a disaster; like a piece of chewy rubber! How it went so wrong was indeed baffling!

With memories of that piece of rubber still dancing vividly in my mind, I shall stay clear from anything complicated.

This is the second roll in my attempt this round. The first one broke when I rolled it; ended up looking like a lopsided layer cake. This one looks more decent.

The recipe is simple, no egg separation, just beat until light and fluffy. And the cake turned out as it is, soft, light and fluffy. A little too soft if you asked me, it was difficult getting them to stand for a shot. Maybe it needs a little more time in the fridge. The other problem was dropping skin! It was just so fragile. I wonder why? For the skinless ones, I used chocolate rice to cover the them, think foundation and makeup or concealer perhaps :)

Did I get it wrong? Frankly, I am not sure! It tasted good though :)

So, with thick skin, I submit this humble beginner roll of mine to Aspiring Bakers #9 - Swiss Rolling Good Times ( July 2011 ) hosted by Obsessedly Involved with Food. Do drop by to see for yourself the amazing compilation that would be available on 1 Aug 2011.

Recipe
Source : Aunty Yochana with adaptations

Adaptations
  • The original recipe was for 5 eggs, as I did not have a pan of that size, I downsized the recipe to 3 eggs (my pan size was 23 * 28 cm)
  • Organic molasses sugar instead of castor sugar
  • Pecans instead of walnuts
  • Whipped Cream instead of Butter Cream
Ingredients

Cake

  • 3 nos. eggs (Large)
  • 50 gm. organic molasses sugar
  • 1 Tbsp. instant coffee (Nescafe) powder mix with 1 Tbsp. hot water
  • 60 gm. Plain flour
  • 35 gm. canola oil
Filling
  • 200 gm. dairy whipping cream
  • 1 Tbsp. castor sugar
  • 1 Tbsp instant coffee powder mix with 1 Tbsp. hot water
  • 50 gm. chopped roasted pecans

Method:

Cake
  1. Whisk eggs and sugar together till light and fluffy.
  2. Add in coffee mixture and gently fold in sifted plain flour,
  3. Add in corn oil and mix well until combined.
  4. Pour into a rectangular tray and bake at 200C for about 8 - 10 mins.
  5. Remove from oven and leave on wire rack to cool completely.

Filling
  1. Whip whipping cream until fluffy.
  2. Add sugar and coffee mixture.
  3. Leave to cool in refrigerator.

Assemble
  1. Turn sponge cake onto a piece of greaseproof paper, spread whipping cream on top and then sprinkle chopped roasted pecans on top.
  2. Roll gently from the wide end into a swiss roll using paper as a guide to lift cake.
  3. Put into the refrigerator to let it set before slicing.

Monday, 25 July 2011

Chicken Rice Malaysian Style


Of late, our country has been attracting some attention, unfortunately of the wrong kind. Nothing that has left us feeling proud except for the bit on Penang's Assam Laksa getting the No. 7 spot on the world's Top 50 delicious food, based on CNN International food survey (The Sunday Star, 24 July 2011). Way to go Penang!

A lot of us (myself included) are sadden and disappointed by the state of many events that have happened. It is even worse when racial or religious sentiments are played when in fact these issues are in no relation to it at all. On the contrary, we live among each other in gracious harmony, more so if emotions along racial/religious lines are left unstirred.


Most of us were brought up to respect each other irregardless of races. We got to know each other, learn each other's culture, appreciate each other's delicacies and sometimes adapt each other's ways into our lives without even realising it.

Food is definitely one thing that brought the many races of Malaysia together. We enjoy Malay food as much as they do, we love their Rendangs, Roti Jala, Dodol, Lemang and so much more. Like wise, the Malays love our Hainanese Chicken Rice, Yong Tow Foo, Paus etc, etc. Our Indian friends' Banana Leaf Rice, Roti Canai, Putumayams , Curries etc etc are food to die for.

I hope I have not confused anyone with the title of this post. By no means is this officially recognised as Malaysian style Chicken Rice. It is just me twigging around with some recipes but I would very much like to think that it is reflective of our Malaysian spirit. Typically, I would prepare Chicken Rice the Chinese way where the chicken is steamed. Instead, I chose to grill some chicken wings with spices following the Malay style.

Some greens were prepared in a style common to the Chinese where the greens are blanched in hot water and then seasoned with some oyster and soy sauce.

As for the rice, I substituted it with butter rice instead of the rice cooked with chicken stock as per Chinese Chicken rice. Butter Rice reminds me of my Indian friends' ghee rice.

The taste blended well with each other, just like how we live peacefully among each other. So, who says we are not Malaysians first?? I believe most of us already are ...

Fellow Malaysians, let's pray and do whatever we can for this motherland that we love!

Source
Grilled Chicken Wings Malay Style ~ Dapurku Sayang
Butter Rice ~ Nasi Lemak Lover


Tuesday, 19 July 2011

Battle of the East

Steamed dishes, they pop up on our dinner table at least twice a week . I guess most of us know the many benefits of steaming our food pretty well. Less oily, retains nutrients, colors and smell, most of all our body will love us for it. Added to that, there's this big fat bonus of it being the easiest, fastest and cleanest method. No greasy kitchen to clean up after. Simply put, the return is high, little effort, huge benefits in terms of healthy eating, time, effort and cost! So, steam, steam and steam we must! Steam anything from fish, prawns, cuttlefish, chicken, meat to vegetables and fruits!

Being a Chinese, I steamed pork ribs quite often. I learnt two new ways of steaming pork ribs recently. One with the Korean Kimchi and the other with the Japanese Miso. Fresh new ways of steaming pork ribs provided one is able to embrace these two gems from the East. I think, the love for them is something that needs to be acquired. Not everyone takes an instant liking (some never) to them (am not sure for those who grew up with it).

The taste of ribs steamed with Miso is closer to the Chinese style of steaming with fermented yellow soybeans.

Steaming with Kimchi, is rather unique. It has a little spiciness to it and eating it together with the meat makes the meat juicier.

Which one is better? Again, I have supporters on both side of the fence (with myself sitting on it)! They are delicious served piping hot with rice. Maybe it's not fair to compare them as their taste are quite unique in their own ways. Now, the next time I do pork ribs, I will need to decide whether it's going to be Chinese (Yellow Soybeans), Korean (Kimchi) or Japanese(Miso), talk about giving yourself headaches!


Steamed Miso Pork Ribs
Source : Assorted Lunch Boxes by Jamie Jong

Ingredients
  • 300g pork ribs
Marinade
  • 2 tbsp miso
  • 1tbsp chopped garlic
  • 1 red chilli, seeded and chopped (omitted)
  • 2 tbsp rice wine
  • 2 tbsp soya sauce
  • 1/2 tbsp cornflour
Method
  1. Mix ingredients for marinade.
  2. Mix marinade with pork ribs.
  3. Leave to marinate for 30 minutes.
  4. Steam over high heat for 20 minutes until pork ribs are cooked through.


Steamed Kimchi Pork Ribs
Source : Steamed Cuisine by Hoe Yee

Ingredients
  • 300g pork ribs
  • 100g kimchi
Marinade
  • 1/2 tbsp light soya sauce
  • 1 tsp sugar
  • 1/2 tsp sesame oil
  • 1/2 tsp pepper
  • 1/2 tbsp corn flour
  • 1 tbsp water
  • 1/2 tbsp cooking oil
Method
  1. Mix ingredients for marinade.
  2. Mix marinade with pork ribs.
  3. Leave to marinate for 30 minutes.
  4. Mix Kimchi with marinated pork ribs.
  5. Steam over high heat for 20 minutes until pork ribs are cooked through.

Share

Twitter Delicious Facebook Digg Stumbleupon Favorites More