Advertisement 300 X 250

Girls' Best Friend

Bright and sparkly. Gemstones came to my mind when I was removing this Dragon Fruit and Orange jelly from the mould. Like a combination of gemstones...rubies, amber and diamonds, all in one!

Dragon's Eyes

The literal translation for the name of a small brown, juicy exotic fruit from the lands of Asia, known as Longan in Chinese, packed into these muffins

Nostalgia

A taste from the humble beginnings, the Long Bean Rice brings back beautiful memories of the yesteryears

Light and Fluffy

Lemon, Yogurt and Cranberries~a nice blend of flavours in a light and fluffy chiffon cake

Bread Stories

Asian style buns ~ Popular as breakfast food or snack, sweet/savoury fillings wrapped in soft, cottony bread

Wednesday 31 July 2013

Just Applelicious

Serving 2 applelicious treats in this post.  As they say an apple a day, keeps the doctor away, so 2 apples a day, keeps the doctor far far away?  Pretty sure most of us won't miss the doctor :)

I love the smell of freshly baked apple treats as almost always they come coupled with sweet smelling cinnamon and that by itself is good enough to perk me up.  I am already on cloud nine when my kitchen is filled with its aroma :)

These muffins were really good.  Super soft and moist, definitely above my expectations for muffins and on top of that it was wholewheat!  Smitten Kitchen (where the recipe was spotted) described it as crazy moist, so go figure!  They are easy to whip up and stores quite well too. A little reheating  is all it needs if you have extras to freeze that is.


Note : The recipe below is for half the recipe and it gave me 7 muffins. I have also reduced the sugar and omitted granulated sugar.   Hit the source for the original recipe.

Recipe
Wholewheat Apple Muffins
Source : Smitten Kitchen who adapted from King Arthur Flour

Ingredients
  • 1/2 cup whole wheat flour
  • 1/2 cup all-purpose flour
  • 1/2 teaspoon baking powder
  • 1/2 teaspoon baking soda
  • 1/8 teaspoon salt
  • 1/2 tablespoon cinnamon
  • 55g unsalted butter, at room temperature 
  • 1/3 cup dark brown sugar, packed, divided 
  • 1/2 a large egg, lightly beaten
  • 1/2 cup buttermilk or yogurt (1tbsp lemon juice with fresh milk to make 1/2 cup and put aside for 5 minutes)
  • 1 large apple, peeled, cored, and coarsely chopped
Method
  1. Preheat the oven to 450°F. Grease and flour 18 muffin cups and set aside. (I used 210C and paper liners.   Although 450 converts to 232, i find it rather high and was worried it will make the muffins dry)
  2. Mix together the flours, baking powder, baking soda, salt, and cinnamon, and set aside. 
  3. In a separate bowl, cream the butter and add half the amount of brown sugar. Beat until fluffy. Add the egg and mix well; stop once to scrape the sides and bottom of the bowl.Mix in the buttermilk gently. (If you over-mix, the buttermilk will cause the mixture to curdle.) Stir in the dry ingredients and fold in the apple chunks.
  4. Divide the batter evenly among the prepared muffin cups, sprinkling the remaining cup brown sugar on top. Bake for 10 minutes, turn the heat down to 400°F (I turned down to 190C), and bake for an additional 5 to 10 minutes, or until a toothpick inserted into the center of a muffin comes out clean. 
  5. Cool the muffins for 5 minutes in the tin, then turn them out onto a wire rack to cool completely.
Don't like muffins? Or have room for more? How about this one?  This is another wonderful applecious treat.  Can't be more appley than apple looking buns with apple chunks and jam for fillings :)) These look cute don't they? I love the idea of using cinnamon stick as the stems, besides looking cute, it gave the buns an added cinnamony fragrance.    It was their cute appearance here that caught my interest.  I think they look more like apples from the top than the front.  From the front, they can pass off as mushrooms instead!  I should have used lesser dough to get a better apple shape, this one is a little heavy at the top.  I will also do away with the 'stem' and the 'leave' and put in a mushroom filling to make them mushroom buns, the next time :)


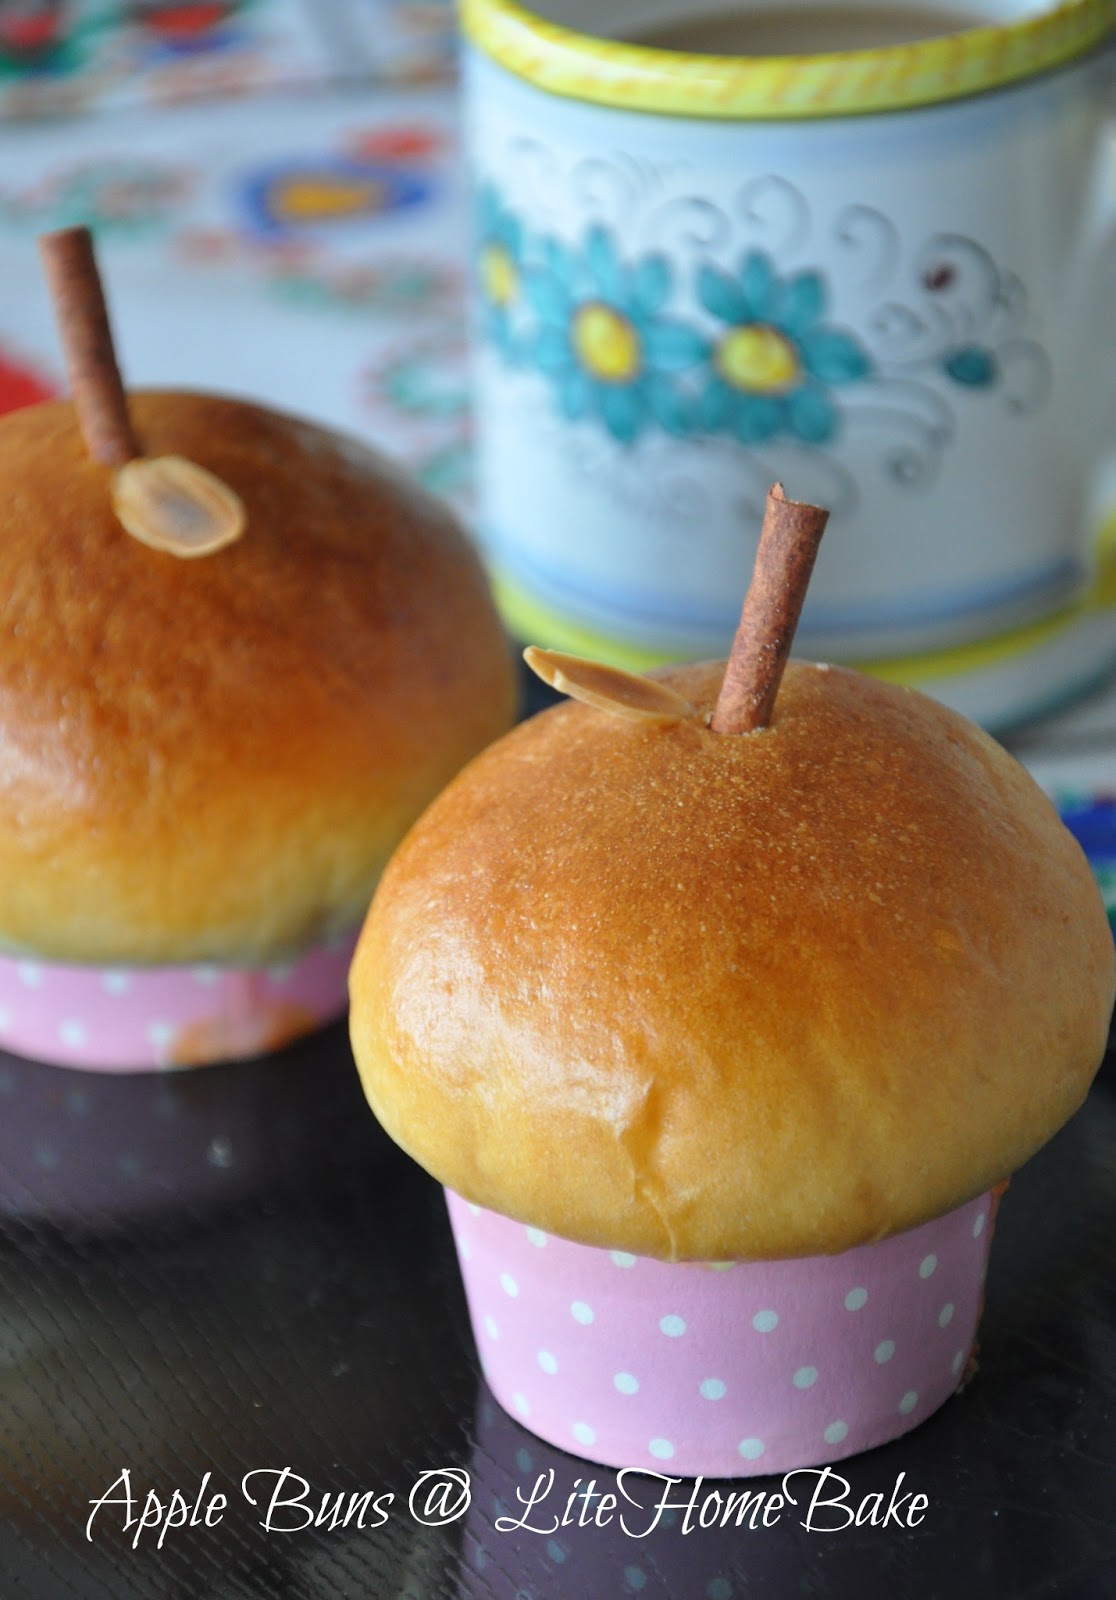
I used a simple straight method bread dough but this recipe is a keeper.  The buns are soft (not as soft as the more sophisticated methods like tang zhong or those with starter doughs) but they are good enough (especially if you are feeling lazy or short of time).    I will let the photo below speak for itself... 


As for the fillings, i spooned in a big heaped tablespoon of my apple jam and added some apple chunks and a small piece of cheddar cheese. 

Recipe
Apple Buns
Source : Bread Magic by Alan Ooi for bread dough

Ingredients

Bread Dough

Part A
  • 300g high protein flour
  • 1/2 tsp salt
  • 1 1/2 tbsp milk powder
  • 50g sugar
Part B
  • 125ml water
  • 1 1/2 tsp instant yeast
  • 1 medium size egg (1 used 2/3 of a large egg and left 1/3 for glazing)
Part C
  • 40g butter
Part D (for glazing)
  • Mix 2 tablespoon fresh milk with 1/3 egg from Part B (I like using this as the glaze, it's not too glossy when egg is used solely or too matte and browns easily when only milk is used) 
Filling
  • Apple Jam (recipe here)
  • 1 medium size apple, peeled, cored, and coarsely chopped
  • 1 slice of cheddar cheese, cut into small rectangular pieces

Method

  1. Combine ingredient A in a mixer and mix well.  Add in ingredient B and beat till a dough is formed.  Add in ingredient C and beat till dough is smooth and elastic to touch.
  2. Leave dough in a big bowl, covered with a damp cloth.
  3. Let it rise in a warm place until double the size.
  4. Divide dough into 50g portions. (Will reduce to 40g the next time around)
  5. Flatten dough then wrap with some filling starting with 1 piece of cheese followed with 1 heaped tablespoon of jam and lastly some apple chunks. It's easier to wrap if it's not too full. 
  6. Arrange on greased tray if not using paper liners.
  7. Cover and rest buns until double the size again.
  8. Glaze with Part D, decorate with cinnamon stick and almond flake.
  9. Bake in a preheated oven at 180C for 15-17 minutes until golden brown.
Note: I combine all the ingredients and let my breadmaker handle steps 1-3.


Tuesday 23 July 2013

G Is For Ginger

It's gingery all the way in this post.   A compilation of dishes from a starter to dessert spiced up with ginger for the fun of joining Little Thumbs Up Event of which ginger is the featured ingredient for this month.  I didn't served them all in one meal though, it would have been ginger overload otherwise!

For starters, here's a Pickled Ginger Salad.  I first learned of this popular Burmese salad from the 06/13 issue of the Flavours magazine.  Unfortunately, i am having trouble accessing older issues of the magazine from my online subscription, so this is not exactly the featured recipe.  I surfed around and found another one for guidance and played by whatever i recalled reading in the magazine.  

As in the name, the main ingredient for this salad is pickled young ginger.  It also has an interesting addition of fried lentils to it.  I simply bought them from our regular Kacang Putih seller (i.e. Indian nuts seller). Overall it is a good appetizer, with a sweet, tangy type of dressing plus some heat from the ginger.  It reminded me of the Yee Sang minus the raw fish served during Chinese New Year.


And here's the meal that went with the Ginger Salad.   I made Szechuan Pepper Roast Chicken and Angel Hair Aglio Olio to go with it.   A little bit of Chinese, Italian and Burmese in one meal! Fusion at its best or weirdest, you decide!   It was quite complimentary though and one thing for sure, everything tasted good on its own :))


Next up is this simple and homey Ginger Fried Rice, this is quite a staple for Chinese mothers in confinement.  However, it's simply ginger, egg and rice when it's served to the new mothers.  To make it a balance meal, i added some greens and shrimps.   Don't the shrimps look lovely dovey like the 囍(shuāngxǐ) character on the bowl?   The word means means double happiness, an ornamental motif widely used during Chinese weddings, incidentally that bowl was my MIL's gift during our wedding, 16 years back :)


Thirsty by now? Here's a gingery drink, which is a popular herbal remedy.  From personal experience, it works well for coughs and indigestion.  I had lots of this as an alternative remedy when i was down with a bad cough during my pregnancy instead of downing cough syrups.   It helped soothe my throat and reduce the coughing which would otherwise kept me awake during the nights.    There are some variations out there which does it with pandan leaves and lemon but personally i prefer the version with just lemongrass, ginger, honeycomb/brown sugar plus a little honey stirred into it before drinking.   Drink it warm if taken as a remedy or chill it as a refresher.


How about a little sweetness to end it all?  I love chiffons for its lightness, it gives me less calorific worries :)   I thought i will give a shot at a ginger flavored one for the purpose of ending this gingery post on a sweet note.  Was keeping my fingers crossed as i have never tried a gingery one before this.

What i did was to add some grated ginger to my favorite orange chiffon recipe.   There's actually a combination of citruses in this cake.  Firstly, i used the juice (and zest)  of what the fruit seller told me was a cross between a grapefruit and navel orange, then i added 1 teaspoon of lemon zest too.  I am quite happy with the results.  It remain citrusy but with a obvious but not overwhelming hint of gingery fragrance.  

I love this recipe, which was the one i used when i first started learning how to bake a chiffon cake. This recipe never fails to give me a tall cake, baked in a 20cm diameter pan with only 5 eggs.   It was really soft to the fact that it was difficult getting it to stand :)   One can just omit the ginger for a orange flavor cake instead.


I hope you have enjoyed browsing through this compilation!


Photobucket

This post is linked to the event, Little Thumbs Up organised by Zoe of Bake for Happy Kids and Doreen of My Little Favourite DIY and hosted by Alvin of Chef and Sommelier


Pickled Ginger Salad

Ingredients
Reference : Culinary Musing of a Silicon Valley Mum & 06/13 Flavours Magazine

  • 1 small jar pickled ginger, julienned 
  • 2 cloves of garlic, sliced and fried
  • 3 tbsp roasted sesame seeds
  • 5 tbsp mixture of fried chickpeas and lentils  (I bought them from Kacang Putih man)
  • 3 tbsp lightly toasted shredded coconut (optional and personally i will leave this out the next time)
  • 1 tbsp of toasted sesame seeds 
  • 1 cup of julienned green cabbage
  • 5 cherry tomatoes, halved 
  • Half a carrot shredded
Dressing
  • 2 to 3 tbsp extra virgin olive oil
  • 1 tsp salt or to taste
  • 2 tbsp or to taste lemon juice (used kaffir lime)
  • 2 tbsp or to taste fish sauce 
Step
1. Mix the salad ingredients with the dressing right before serving.

Note :
  1. It is not necessary to follow the exact measurements, play around with the combination according to preference.  
  2. Go easy with the lime juice and add on if necessary.

Ginger Fried Rice

Ingredients
  • 1 bowl of cooked rice
  • 1 medium size egg, lightly beaten
  • 4 medium size shrimps, shelled (leave tail intact) and deveined
  • 1 inch ginger knob, julienned
  • 3 french beans, diced
  • 1/2 of medium size carrot, diced
  • 2 tbsp sesame oil 
  • 1 teaspoon Shaoxing cooking wine
Method
  1. Marinade shrimps with 1/2 teaspoon of salt and a dash of pepper.  Leave aside for 15 minutes.
  2. Heat up wok and pan fry shrimps without oil.  Set aside.
  3. Using the same wok, fry ginger until slightly dry.
  4. Add in sesame oil and fry until ginger is fragrant.
  5. Add in french beans and carrot. 
  6. When vegetables are half cooked, add in rice.  Mix well.
  7. When rice is hot, push aside rice and pour in egg.  When egg is slightly cooked, push rice back onto egg and scrambled together with the rice.
  8. Season with some salt and cooking wine.
  9. Add in shrimps and mix well.

Lemongrass Ginger Drink

Ingredients
  • 5 stalks of lemongrass (use white part only), trimmed and bruised with back of cleaver
  • 2 inch ginger knob, sliced and bruised with back of cleaver
  • 1 liter water
  • 3 tbsp brown sugar
  • Honey
Method
  1. Combine lemongrass and ginger with water in a medium size pot.
  2. Bring to a boil then simmer with lid on for 30 minutes.
  3. Add in sugar and continue to simmer for another 5-10 minutes.
  4. Sweeten with  some honey prior serving.

Orange Ginger Chiffon Cake
Adapted from Orange Chiffon Cake by All That Matters

Ingredients

(A)
  • 4 egg yolks
  • 30g castor sugar
  • 1/4 tsp salt
  • 40g corn oil
  • 140g orange juice
  • 2 tbsp grated ginger
  • Zest  from 3/4 orange and 1/2 lemon
(B)
  • 120g Cake flour
  • 1/2 tbsp baking powder
*Sift 2x

(C)
  • 5 egg whites
  • 40g castor sugar
  • 1/2 tsp Cream of Tartar (1 tsp lemon juice)

Method

  1. In a bowl, using hand whisk, whisk yolks and sugar till sugar dissolves.
  2. Add oil and salt, whisk and add orange juice, zest and grated ginger. Stir well.
  3. Fold in sifted flour and mix well.
  4. In another bowl, using an electric mixer, beat till the whites are frothy. Add in Cream of Tartar and beat till soft peaks.
  5. Add in sugar gradually and beat till stiff peaks.
  6. Fold in 1/3 of the whites into the yolk mixture using a spatula till incorporated.
  7. Pour the mixture to the remaining egg whites and fold in gently till incorporated.
  8. Pour the batter into a 20cm chiffon tube pan. Bang the pan on the table to get rid of bubbles.
  9. Oil a piece of aluminium foil and cover the pan loosely. Bake at 170C for 10mins.
  10. Turn down the temperature to 160C and bake for 10mins. Lift up the foil to check the surface of cake, bake for another 10mins.
  11. Insert a skewer to check if cake is done. Remove the foil and reduce the temperature to 150 deg.C and bake for a further 5 to 10mins to brown the surface.
  12. Remove from the oven and invert the pan. Remove the cake from pan when it's completely cooled.
Note : I baked mine at 180C for 40 minutes, then removed foil and continue to bake at 170 for another 10 minutes.

Thursday 11 July 2013

Not One But Three

Love curries? If you do, there are three to choose from in this post :)  I was looking at my backlog and started scratching my head (while sighing).  So, i decided to clear all three curry dishes in my backlog in this one post.  And having three to pick from is better than one if you are looking for a curry to make, surely.

Curries are popular dishes in the Asian part of the world.  It has become a dish that is very varied with the different cooking styles though underlying it is still meat/vegetables cooked in a rich concoction of spices.  My family love curries, everyone will be eagerly waiting for meal time once they catch a whiff   of it.  

In this post you will see that each of these curries have their own main ingredient lending each variation a distinctive taste of its own.

First up is this Vietnamese style spicy lemongrass chicken.  This was quite popular among bloggers some time back and I have made it a couple of times since then.  As in the name, the key ingredient for this one is the lemongrass which gives it a nice, lemony fragrance.  The use of fish sauce and palm sugar gave the curry a light savory sweet umami flavor.    

I did not follow the original to the T, mainly to make it more convenient for me.


Recipe-Vietnamese Spicy Lemongrass Chicken
Source : First spotted on Nasi Lemak Lover with original recipe from Echo's Kitchen

Ingredients

Spicy lemongrass paste
  • 5 Fresh Lemongrass(use only the white part)
  • 25 Dried Red Chilireplaced with 5 tbsp grounded chili paste)
  • 1 1/2 inch of ginger root 
  • 8 Cloves of garlic
Method
  1. Slice the lemongrass and ground it together with all other ingredients into a paste.  
  2. It is OK if the paste is a little coarse
Spicy Lemongrass chicken
  • 1/3 cup cooking oil
  • 3 tbsp Spicy Lemongrass Paste
  • 500g chicken pieces/chicken breast pieces(marinate with a pinch of black pepper powder and some salt)
  • 1 tsp Meat Curry powder (1 tsbp)
  • 1/2 onion, chopped ( 1 big onion)
  • 1 tbsp Soy sauce/Fish Sauce 
  • 1/2 tsp Salt (1 tsp) 
  • 1/2 tsp Sugar/Palm Sugar (shaved palm sugar to taste)
Method
  1. Heat up oil in pan then fry lemongrass paste until fragant and slightly dry.
  2. Remove the additional paste leaving 3 tbsp of paste in the pan.
  3. Add in chicken and fry to coat with spices.
  4. When grease released from the chicken is visible, stir in the chopped onion, and cook for another minute until onion soften, add in curry powder and stir well until it smells fragrant.
  5. Add about 1/2 cup of water, salt, soy sauce/fish sauce and sugar.
  6. Bring it to boil then simmer until chicken is cooked and until gravy is reduced to preferred thickness.


This other curry is the Green Curry which is a popular Thai cuisine.   It obviously got its name from its colour, and its color from green chillies and coriander.  Don't be deceive by the color though, it can be as fiery as its redder cousins. The aroma can be quite strong and may not be well received especially for those who dislike coriander.  If so, the amount of coriander used can be slightly lessen.

This is my first time making green curry, thought I would give it a try after drooling at the one blogger friends,  Kimmy and Phong Hong posted.


Recipe-Thai Green Curry

Ingredients for Paste 
(A)
  • 3 lemon grass (white part only)
  • 1 inch piece ginger
  • 1 tsp black peppercorns 
  • 4 large green chillies
  • 10 small Thai green chillies
  • 4-5 cloves garlic
  • 10-12 shallots
  • 2 tsp grated kaffir lime zest
  • 2-3 stalks fresh coriander with roots
(B) 
  • 1 tsp salt
  • 2 tsp coriander powder
  • 1 tsp cumin powder
  • 1 tsp tumeric powder
  • 2 tsp fish sauce
  • 1 tbsp oil
(C)
  • 800 gm chicken thighs - cut bite size pieces
  • 1-2 stalks basil leaves - used the leaves only
  • 5-6 kaffir lime leaves - shredded finely
  • 150 ml water
  • 100 ml coconut milk
  • 2 medium size eggplants (cut into half then slice to 3 inch long pieces)
  • 3-4 tbsp oil
  • 1/2 tbsp salt
  • 1 tsp sugar to taste

Method
  1. Blend ingredients A in a blender until fine.
  2. Mix with rest of ingredients B into a paste.
  3. Fry paste with about 100 ml oil until oil separates then remove additional paste to store if amount of meat is lesser than amount noted.
  4. Add in chicken pieces and mix well.  Add in water after meat turns opaque.
  5. Bring to a boil then add in eggplants.  Simmer until chicken is tender.  Add in coconut milk.  Cook until gravy is slightly thick.  Add seasoning to taste.
  6. Stir in the basil leaves and kaffir leaves if serving immediately otherwise add the leaves when reheating the curry before serving.

And the last one here (but not the least definitely) has an Indian origin, specifically a town named Goa in Southern India.   This type of curry is known as the Vindaloo.   And it's also interesting to know that  the Vindaloo originated from a Portuguese dish known as Carne de Vinha d' Alhos,  which is a meat dish (normally pork) cooked with wine vinegar(vinha) and garlic(ahlo).  The Indians then added their signature touch to it with fiery spices after the Portuguese explorers introduced it to them when they arrived  at Indian shores way back in the 15th century.

I am not sure how authentic this recipe is, it was from a recipe booklet that came free with a tub of yogurt.  The original recipe called for chicken but i used pork ribs instead.  As the norm with complimentary recipes, one of the ingredient has to be the one from the sponsor.  Yogurt was used to marinate the meat.   It's quite an easy recipe as it suggested use of instant curry paste.  This was the first time i tried this recipe and we loved it.  The use of yogurt instead of coconut cream made it less guilty but just as flavorful.  The addition of some tomato sauce gave a slight sweetness to it too.
    

Recipe-Pork Vindaloo
Source : Nestle Yogurt Recipes Collection

Ingredients
  • 500g pork ribs/chicken pieces
(A)
  • 6 tbsp set yogurt
  • 1 tbsp lemon juice
  • 1 tbsp pounded garlic
  • 1 tbsp pounded ginger
  • 1 tsp grounded black pepper
(B)
  • 1 sachet curry chicken paste (1/3 packet of Tean's Gourmet Chicken Curry Paste)
  • 1 onion diced
  • 2 sprig of curry leaves
  • 1 tomato diced
  • 1 tsbp tomato ketchup
  • 3/4 cup water
  • 1 stalk coriander leaves
Method


  1. Marinade meat with ingredients from Part A for several hours  (I only had time to marinate it for 1 hour).
  2. Heat oil and fry onion until soft and fragrant.
  3. Add curry leaves, tomato and curry paste.  Fry until aromatic.
  4. Add in marinated meat and mix well.  Add tomato ketchup and water after meat turns opaque.
  5. Simmer until gravy is slightly thick and meat is cooked and tender.  (I let it simmer for 15 minutes before transferring it to the pressure cooker for 5 minutes to have a nice melt in your mouth ribs)
  6. Season with salt and pepper.
  7. Garnish with coriander leaves.


Saturday 6 July 2013

It's a Mango Delight


This is slightly off-season since the mangoes have come and gone, well at least in my part of the world that is.  But hey, they will be back sooner than you can imagine, time flies :)  This was made about a month and a half back, somewhere in May when mangoes flooded the market.   I love eating them fresh the best, but we weren't eating fast enough.    There were lots lying around in the house at that time.   There was some greed buying i admit, we had an entire crate that hubs brought back from India too, plus quite a few (and the dragon fruits too) that my friends brought over when they visited.

I love how these turned out, they are as tasty as they look :)   The inspiration to make this combination came from wanting to make good use of the 2 fruits that my friends brought over and i remember being attracted to something similar at  Jessie's Cooking Moments some time back. 

The taste of this mango pudding dressed with some dragon fruit jelly and mango cubes was very refreshing.  The pudding was smooth , creamy and had a very rich mango flavour.   The dragon fruit jelly broke the monotony of the creamy pudding and the little black seeds provided a nice bite.  It was a nice combination of sweet and tangy deliciousness in a dessert.

I only had two of them in these cute little bottles.  These bottles were containers for some imported yogurt and they were the most expensive yogurt that i have ever bought, hence i bought only 2!  I was more interested in the bottles than the yogurt in them when i bought them!  The yogurt was good though.  If i had more, i believe they will make quite an impression if served during parties :)

On a last note, apologies for not having a photo to show the texture of the pudding.  I rushed to take this photo just before sunset and at that time it wasn't completely set yet, so no digging in yet.  Then it was too dark for good photos (by my skills) when we indulged and like they say the rest is history :)

Recipe-Mango Pudding
Source: Food4Tots

Ingredients
  • 2 large ripe mangoes (250g for puree and 300g for cubes)
  • 9g (3tsp) gelatin powder
  • 1 tsp lemon juice
  • 50 sugar 
  • 100ml + 40ml water
  • 80ml fresh cream (I used whipping cream)
Method
  1. In a small glass bowl, sprinkle gelatin powder over 40ml water. Let the gelatin absorb the liquid and bloom.  Set aside.
  2. Cut and slice mangoes. Set aside 300g to cut into small cubes.
  3. Blend 250g mango flesh into puree.  Add in ½ tsp lemon juice and mix well.
  4. Add another ½ tsp lemon juice to mango cubes and set aside.
  5. Use a medium saucepan, add in 100ml water and sugar. With low heat, bring it to a boil to dissolve the sugar. Off the heat and add in the soaked gelatin into the pan to combine with the sugar mixture.
  6. Add in mango puree and mix well.
  7. Add in 3/4 of the mango cubes and mix well.
  8. Add in fresh cream and mix well.
  9. Transfer the saucepan to a large pot (or any kind of container with large base) that filled with ice water. Use a spatula or wooden spoon to stir the pudding mixture until it becomes slightly thick. Remove the pan from the ice water. 
  10. With a large spoon/ladle, pour the pudding mixture into moulds/ramekins.   Place the moulds/ ramekins onto a tray.  Chill it while dragon fruit jelly is being prepared.

Recipe-Dragon Fruit Jelly
Ingredients 
  • 25 gm. sugar
  • 1 tsp. agar-agar powder
  • 150 ml water
  • 40 gm red dragon fruit, pressed into a puree with a fork (don't blend to have seeds in whole)
  • 1 tsp lemon juice
  • 2 pieces of pandan leaves 

Method 
  1. Boil sugar, agar-agar powder and water with pandan leaves in a pot until agar agar and sugar dissolves.
  2. Lower flame and mix in dragon fruit puree and lemon juice.
Assemble
  1. Pour some dragon fruit jelly on top of pudding that has slightly set. 
  2. Chill until pudding completely sets.
  3. Serve topped with some mango cubes.

Note:
  1. It is important to use mangoes that have ripen (but not too soft), sweet and less fibrous for a good result.   I used the Thai Rainbow mangoes for this.
  2. There will be some extra dragon fruit jelly if poured in this proportion.  One can either pour more or set them in separate moulds.

Share

Twitter Delicious Facebook Digg Stumbleupon Favorites More