Advertisement 300 X 250

Girls' Best Friend

Bright and sparkly. Gemstones came to my mind when I was removing this Dragon Fruit and Orange jelly from the mould. Like a combination of gemstones...rubies, amber and diamonds, all in one!

Dragon's Eyes

The literal translation for the name of a small brown, juicy exotic fruit from the lands of Asia, known as Longan in Chinese, packed into these muffins

Nostalgia

A taste from the humble beginnings, the Long Bean Rice brings back beautiful memories of the yesteryears

Light and Fluffy

Lemon, Yogurt and Cranberries~a nice blend of flavours in a light and fluffy chiffon cake

Bread Stories

Asian style buns ~ Popular as breakfast food or snack, sweet/savoury fillings wrapped in soft, cottony bread

Tuesday 30 August 2011

Wa Si Hokkien Lang


Do you know your roots?? Yes? Do you know enough about it then? Edith of Precious Moments' invitation to participate in her Heritage Food Trail event got me thinking for awhile. I was touched that she left a personal note to extend the invitation. Thanks, Edith.

Well, I only know this fair bit about myself. As we say in our dialect, Wa Si Hokkien Lang meaning I am Chinese, from the Hokkien clan, and if I were to trace it down a little deeper, I was told our family originated from the Eng Choon sub-clan. Basically this means, our ancestors came from the Fujian Province of China. Being what is known as the Banana kind to our fellow Chinese (i.e. Yellow Outside, White Inside aka Chinese who doesn't speak/read Chinese but English), we never got much exposure about our Chinese roots. Although I don't read Chinese, I am proud to say I can speak Hokkien fluently. We needed it to talk to our grandparents, Ah Mah (grandma) and Ah Kong (grandpa) otherwise they would need to learn how to speak English instead (which i think they did pick up a smattering bit along the way :)) Nowadays, I tend to be more appreciative of the ability to converse in our dialect. Whenever I meet somebody from the same clan, we break into our dialect (they say those from the same clan are distant relatives, in most cases the distance beyond imagination). Unlike back then, I remember it felt so proud to be able to speak English to a fellow Chinese. Getting more appreciative of my roots, a sign of old age?

Now how many Hokkien dishes do I know? Most of what I think are Hokkien dishes were introduced to me by my Ah Mah, in fact I have a "Ah Mah's Inspirations" category which I intend to build to cherish her memories. Ah Mah didn't really hand down her recipes, hers were built over the years through experience and stored within her memory. For the times that we remembered to ask when we were not too busy indulging, it would be in "agak-agak" (estimate) units which can become more complicated when one discovers she has her very own measuring tools. We have ourselves to blame for not putting in much practice and also by allowing Ah Mah to spoil us.

When I was young, I always had the impression that whatever Ah Mah made belonged to our clan but nowadays I am not too sure anymore because I see so many similiarities among the other clans, it becomes a little more tricky, making me wonder "Is this ours or theirs?" Maybe it's my ignorance that is causing this confusion. Hopefully, I will learn more through Edith's event. However, I am pretty sure I wouldn't go wrong with this one, since it popularly known by its Hokkien name, the Bak Chang (steamed meat rice dumplings). No, this post is not about Bak Chang, simply because I don't make them very well. So, here I am with it's close cousin, Steamed Glutinous Rice in Hokkien Style :)

It was known as Ee Peng to the family. My strongest memory of this dish would be eating it when we celebrated the full moon of a new addition to the family. Besides this, we had pickled ginger, red eggs and the angku kuih too (a type of sweet steam cake). At that time these celebrations were not too far apart since there are close to 30 of us in my generation, within the extended family that is :) Ah Mah was indeed proud of her broods.

The rice is stir-fried with dried shrimps, shitake mushrooms, meat, chinese sausage before being steamed. Dark soy sauce being the main seasoning used, complements the dish (which by itself is already very flavourful) with a nice aroma and its dark brown colour. I maybe wrong but I think we Hokkien Lang like dark soy sauce, a lot of our dishes are 'black black' in colour! This dish is quite similar in taste to the cantonese version of Loh Mai Kai commonly found in Dim Sum restaurants. The difference is in the Hokkien version the accompaniments are mixed into the rice, as such one gets to eat them throughout in a more even manner.

Here's the recipe based on what I learned from Ah Mah's version and I made reference to Wen's version on Wen's Delight just to make sure I was on the right track.

I was contemplating whether to continue with this when I noticed that Honey Bee Sweets had already posted this dish on her blog in conjunction with the same event while I was preparing this post (yes, I am that slow, unfortunately). I decided to go on when I noticed that her recipe is slightly different. I thought why not go ahead and share it so that we can also see the different variations in each other's home.

One would also see this in many other sites. Ah Mah's version had little tofu cubes and we don't use ginger in it. Another thing, we don't steam or serve it in little bowls in an upside manner like the Loh Mai Kai although i am not sure whether it's just for photography effect. I believe none is superior than the other but don't we all treasure our house version, priceless for all the love, the stories and the memories behind it.


Recipe

Ingredients
  • Glutinous Rice - 300g (Soak for 3 hours and drain)
  • Pork - 150g (Cut into small strips, season with 1 tsp oyster sauce, 1tsp soy sauce, 1 tsp dark soy sauce and 1/2 tsp corn flour)
  • Dried Shitake mushroom - 50g (Soak to soften and cut into strips)
  • Dried Shrimps - 40g (Washed, drain and leave some in whole and chop others to smaller pieces)
  • 3 pieces of fried tofu (Cut into small cubes and fried)
  • 1 Chinese sausage (Sliced)
  • 7 Shallots (Sliced)
  • 2 cloves of Garlic (Chopped finely)
Seasonings
  • 2 tbsp dark soy sauce
  • 1 tbsp light soy sauce
  • 2/3 tsp salt
  • 1 tsp pepper
  • 1/2 cube chicken stock
Garnish
  • Fried Peanuts
  • Fried Shallots
  • Chopped Spring Onions
Method
  1. Heat oil in wok and stir fry shallots until slightly brown. Remove 1/3 and drain dry for garnish.
  2. Add in garlic.
  3. Add in dried shrimp, continue to stir fry until fragrant.
  4. Add pork and mushroom. Stir fry until pork is cooked.
  5. Add in rice and seasonings.
  6. Add in 2/3 bowl of water and let in simmer until water dries up.
  7. Transfer into steaming tray and steam for 30-45 minutes until rice is cooked and soft.
  8. Garnish with peanuts, shallots and chopped spring onions.

I want to take this opportunity to dedicate this post in Ah Mah's memory in conjunction with Edith's Heritage Food Trail event.


On a lighter note, fellow Hokkiens or those who speak this dialect or even those who don't (to hear what our dialect sounds like), check out this funny song, Wa Si Hokkien Lang.

Thursday 25 August 2011

When Mum is Lazy...


Are Mums allowed to be lazy?? All in One Meals, I am pretty good at this especially when the lazy bug bites :) But All in One is pretty cool is it not? Shortcuts and laziness aside, although no frills, these All in Ones are still nutritious and balanced meals, this I don't mess around with. Some thoughts put in to ensure essentials from the food pyramid gets thrown into that 1 lazy dish. Fuss free cooking and fuss free eating too. With mine, I assure you it's almost always a 1 spoon thingy. And you can multi-task while you eat (house rule allowing). Imagine this, laze around the couch, 1 hand holding the plate and the other alternating between the spoon and turning the pages of the newspapers or switching between TV channels with the remote control. Ha, the simple pleasures of life, lest we forget...

With veggies providing fiber and vitamins, protein from the meat and carbs from the rice, all nicely topped with a bright sunny side up egg. Pretty complete, right? The dish is a common chinese stir fried veggie dish, french beans stir fried with minced meat and preserved soy beans.

Honestly, this All in One actually tastes quite good, especially when you served it piping hot. When you cut into the egg, the runny yolk will coat the rice like gravy, you then eat it together with the veggies in big mouthfuls (yes, you heard me correctly, table manners aside bigger mouthfuls give more pleasure). Simple indulgence, a luxury at times :)

Here's the recipe (more or less, it won't hurt)

Ingredients
  • 300 g french beans
  • 3 cloves of garlic (chopped)
  • 200g of minced meat
  • 1 teaspoon of minced fermented soybeans
  • 1/2 teaspoon of fermented black beans (chopped)
  • 1/2 teaspoon sugar
  • 150ml water
  • 1 tablespoon chinese cooking wine

  1. Bring a saucepan of salted water added with 2 drops of oil to a boil, then add french beans. Cook for 2-3 minutes until tender. Drain and soak the beans in ice-cold water for a while. Drain and set aside.
  2. Heat up about 2 tbsp oil, saute garlic until fragrant.
  3. Add in fermented black beans and soybeans, continue to fry until fragrant.
  4. Add in minced pork and stir fry until meat is cooked.
  5. Add in French beans, then sprinkle sugar and mix
  6. Add water. Once water boils, dish is ready.
  7. Add a little chinese cooking wine from the side of the wok (optional).
  8. Scoop on to rice and serve immediately.

Tuesday 23 August 2011

Flower Fries


Another misleading name probably? I like doing this in return for little one's expression when he is told what he's getting. These are cauliflower fritters actually. Over where I am, one would find them in vegan restaurants. Cauliflower fried in a batter tastes quite different from eating it on its own, a nice soft texture and a light fragrance. They make healthy snacks for kids. Great way to get them to eat more greens although not literally. This one doesn't even taste like vegetables with a plus of it not being green in color.

I saw this recipe when a chef/regular columnist in a local newspaper obliged a mother's request for it. I was attracted when I saw that the recipe listed cheese as one of the ingredients. I don't recall tasting cheese in the ones that I had.


So, that's how I ended up with these and how they ended up in little one and his friends' stomachs over lunch in school. The kids loved them and I was very glad when I saw a squeaky clean lunch box :)

Recipe
Source :Kuali.com (Amy Beh)
Ingredients
  • 700g cauliflower, cut into florets
  • 200g self-raising flour
  • 1 tbsp rice flour
  • 1/2 tsp pepper
  • 1/2 tsp salt or to taste
  • 1 tbsp chopped garlic
  • 2 tbsp chopped coriander
  • 2 tbsp chopped spring onion
  • 1 tbsp chopped red chilli
  • 2 tbsp grated parmesan cheese
  • 1 egg, lightly beaten
  1. Bring a saucepan of salted water to a boil, then add cauliflower. Cook for 2-3 minutes or until tender. Drain and soak cauliflower in ice-cold water for a while.
  2. Drain from the ice-cold water, then chop cauliflower roughly. Add cauliflower into combined flour mixture.
  3. Add garlic, coriander, onion, chilli and cheese. Stir to combine. Pour the beaten egg over and stir until well combined. Gradually add in 50-60ml water. Stir into a very thick batter. (If it is too dry, add a little more water.)
  4. Heat oil in a wok, spoon in a tablespoon of mixture into the hot oil. Do not over-crowd the wok. Fry for 4-5 minutes on each side or until golden and cooked through. Dish out and drain. Serve the fritters with chilli sauce.

Tuesday 16 August 2011

One Year Older...One Year Yummier?


Time flies (obviously) I have been blogging for a year already. It also means that it has been a year off what I used to be doing, of which tinkering around the kitchen was something uncommon.

I am definitely no great chef sharing my secrets, merely someone jotting down and sharing some of the lessons that I have learnt along the way. My success, my disasters, yummies, yuckies and everything in between. Most of the time (all the time would be more accurate) simple stuff to feed my loved ones, good enough to warm their hearts and stomachs . It would be a bonus if some of my experiences have been inspiring to those who cared to dropped by.

No big achievements, small steps maybe. Good enough for our dining table to be laid with a bigger variety and yummier food too, perhaps :) I am comforted by the fact that the family is consuming a whole lot more homemade stuff than before. Not necessarily yummier but it comes with a lot more than money can buy, that bit I am proud of.

Little one suggested that I should have a post to commemorate it. He suggested that I make something in the shape of no. 1, to which I replied with a big No! I didn't make anything special but I thought I would share this recipe for 'Polo' Bun which I think by far is the best 'Polo' bun that I have made.

If you have not heard of it, 'Polo' Buns are butter buns made famous in Hong Kong, the word 'Polo' means pineapple in Cantonese, hence 'Polo' in inverted comas :) Contrary to the name, they do not have pineapples in them but a layer of crust like dough laid on the surface of the buns with crisscross patterns drawn on them, making them look like pineapples.

They say, good things happen once in a blue moon. I had this book with me for sometime already but somehow this recipe or even its picture didn't catch my eye before this. Not that I have not made Polo buns prior to this. I was captivated by its picture this time around. I took a look at the recipe and noticed that the recipe for the top crust layer was different from those that I have read or followed. As for the bun, the recipe given was a straight dough method. I preferred buns made using the sponge dough method (from the same book), so I followed my heart.

Verdict?
Firstly, I loved how they turned out. They looked very pretty with nice cracks on the top layer exposing a nice brown tint from the chocolate flavoured bun below (it would be prettier if the shade was a little darker). No crisscrossing needed, the veins were au naturale. Round and bumpy they are too, aren't they? The buns? Soft and spongy! The were delightful when they were out from the oven, the crispy crust went very well with the buns. I seriously think God had a hand in this, maybe it's His way of encouraging me to continue this journey!


This is how it look inside, the photo sucks, it was getting dark and I never get good pictures with flash. Excuses, I could have done one the next day but I was lazy :))


Recipe
Source : Bread Magic by Alan Ooi (Chocolate Polo Bun) with variations

Ingredients

Bread-A

  • 200g high protein flour
  • 1tsp instant yeast
  • 1 tbsp sugar
  • 120ml water
Bread-B
  • 150g high protein flour
  • 60g sugar
  • 1 tsp salt
  • 2 tbsp milk powder
  • 1 tsp instant yeast
  • 1 egg

Bread-C
  • 50g butter
Method
  1. Combine ingredients Bread-A and place in mixer. Beat for 2 minutes until soft dough is formed. Leave dough in big bowl, cover for 2 hours to slow proof.
  2. After 2 hours, put ingredients Bread-B in a mixer. Add in fermented dough from step 1 and beat for 5 minutes. If dough appears too dry, drizzle in a bit of water. Add in butter of ingredient Bread-C and beat further for 3 minutes until dough has a smooth and elastic touch.
  3. Leave dough in a big bowl, covered with a damp cloth for 20-30 minutes rest.
Variation
I used my breadmaker to do step 2 and 3. I waited until the dough double its bulk.


Toppings - A

  • 20g shortening
  • 50g salted butter
  • 70g icing sugar
Toppings - B
  • 1 large egg
Toppings - C
  • 10g milk powder
  • 170g plain flour

Method

Toppings

  1. Beat Toppings-A till softened, add in Toppings-B, beat well.
  2. Mix in Toppings-C.
  3. Roll toppings dough into flat sheet.
  4. Keep refrigerated for easier handling.
Assemble
  1. Mould bread dough into small balls of 35g each. Let it rest for 10 minutes.
  2. Slightly flatten each ball of dough into a round.
  3. Wrap some toppings into the ball of dough (My own step)
  4. Take some toppings (mold into small round of approximately 20g) in one hand and bread dough in another.
  5. Take some toppings in one hand and bread dough on another. Push bread dough into toppings from outside to inside by turning the palm of the hand with the toppings until 3/4 of the dough is placed inside the toppings. (This step gives well wrapped and rounded buns).
  6. Let dough rise for another 30 minutes.
  7. Egg wash and bake in preheated oven at 180C for 12-15 minutes.


Wednesday 10 August 2011

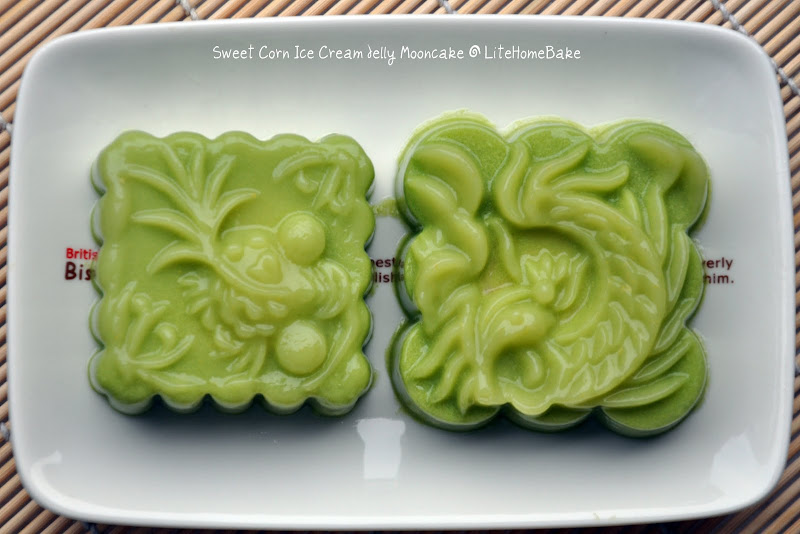
The Dragon and the Fish


In comes the dragon and the fish. These jelly mooncake moulds come in many shapes and designs and the dragon and the fish being auspicious animals for the Chinese, are not left out. The dragon symbolizes prosperity and longevity while the fish with a pronunciation similar to the Chinese character for abundance symbolizes wishes for everything in abundance (wealth, health etc, etc).

Dragon and fish in another flavour of jelly mooncakes, you will be reading at least 4 of this kind. I need 4 to fit prettily in a gift box :) This is the second one after the red dragon fruit. Sweet corn with pandan. Colourful, in shapes of auspicious symbols and different flavours, these make wonderful gifts for the festival. It's more difficult to create the color impact with baked ones, might be achievable with snow skin though. I now have red and green in the box, 2 more colors to go, a jade like one and gold brown perhaps for more prosperity :)


This is also a new recipe that i tried this year. Last year I had a green one coming from green tea and soy milk. This one has sweet corn for the filling and the skin is pandan infused coconut milk. Oh, with some ice-cream added to it too! Maybe green tea should stay as the choice for elders :)

Recipe
Source :Adapted from Mooncake Selections by Khoo See Yew
Makes : Approximately 5 pieces (with similar moulds)

Ingredients for Filling
  • 15g gm. caster sugar
  • 1 tsp agar-agar powder
  • 60 thin coconut milk
  • 75g sweet corn (cream style)
  • 60ml thick coconut milk
  • 25g sweet corn ice cream
  1. Boil sugar, agar-agar powder and thin coconut milk in a pot until agar agar and sugar dissolves.
  2. Lower flame and mix in sweet corn (cream and ice-cream) and thick coconut milk. Stir until ice-cream dissolves.
  3. Pour in small bowls and let it set.
  4. Remove from bowl, use a fork to scratch surface (top and bottom). This is to make sure the filling and skin will stick to one another.

Ingredients for Skin
  • 50g sugar
  • 3 tsp agar-agar powder
  • 350ml thin coconut milk (See Note)
  • 100ml thick coconut milk
  • 1/4 tsp salt
  • 40g sweet corn ice-cream
Note to get 350ml thin coconut milk
Blend 6 pieces of pandan leaves with 300ml water, sieve through and add 50ml coconut cream to form 350ml thin coconut milk (Add water if insufficient)
  1. Boil sugar, agar-agar powder and thin coconut milk in a pot until agar agar and sugar dissolves.
  2. Lower flame and mix in sweet corn ice-cream, salt and thick coconut milk.

Assemble
  1. Pour in some skin agar agar into mooncake mould.
  2. When it is half set, put in the filling then pour the balance skin mixture into the mould until full. Let it set.
  3. Chill in the fridge before serving.

Tuesday 9 August 2011

Red Dragon Fruit Jelly Mooncakes


A third type of mooncakes, more of a lookalike than the real thing. Totally different ingredients and as a result, different texture and taste all together. Made from jelly, both skin and fillings, so basically, it tastes jelly. Not sure how and when it came about, some say it's the healthier version of the mooncake. True in some way, but we only eat mooncakes once a year, why refrain and eat lookalikes?? I say, indulge in both, real and lookalikes!

This one had red dragon fruit for the skin, which is actually one of the flavour that I make quite often for jellies. I like the refreshing taste and the bright color. The only difference is to make it a mooncake lookalike, it has another layer of jelly within. Most of the time, a flavour that is able to complement the skin both in terms of taste and color will be the chosen candidate for the filling, feels like playing matchmaking :) Last year, my dragon fruit jelly mooncakes had black sesame fillings, this time, I thought why not give him a new companion? I went without the black sesame seeds and used milk instead of coconut milk. The change was made mainly because I wanted to see if the red & white color combination is prettier than red & black.

Taste wise I think black sesame is more distinctive. Color wise, i think they are equally pretty.

Recipe
Source :Adapted from Mooncake Selections by Khoo See Yew

Ingredients for Filling
  • 25 gm. caster sugar
  • 1 1/2 tsp agar-agar powder
  • 125 ml water
  • 70 ml fresh milk
  • 55 ml evaporated milk
  1. Boil sugar, agar-agar powder and water in a pot until agar agar and sugar dissolves.
  2. Lower flame and mix in milk.
  3. Pour in small bowls and let it set.
  4. Remove from bowl, use a fork to scratch surface (top and bottom). This is to make sure the filling and skin will stick to one another.

Ingredients for Skin
  • 100 gm. sugar
  • 4 tsp. agar-agar powder
  • 600 ml water
  • 150 gm red dragon fruit (blended)
  • Few pieces pandan leaves
  1. Boil sugar, agar-agar powder and water with pandan leaves in a pot until agar agar and sugar dissolves.
  2. Lower flame and mix in blended dragon fruit.

Assemble

  1. Pour in some skin agar agar into mooncake mould (If a see-through effect is preferred (i.e. can see the filling), lessen the amount put in).
  2. When it is half set, put in the filling then pour the balance skin mixture into the mould until full. Let it set.
  3. Chill in the fridge before serving.

Thursday 4 August 2011

Snow Skin Mooncakes


More mooncakes :) A batch of what is known as snow skin ones. These are meant to be eaten chilled, i think that's where it got it's name from although technically, the direct translation from Chinese should be ice, somehow snow has a more sophisticated feel, i guess.

They are made from cooked glutinous rice flour. Some say this is the easiest version of mooncakes. I agree to certain extend, if you are able to get cooked glutinous rice flour, all it needs is to make the flour into a dough before wrapping it with some fillings. Put it into a mooncake mould, press it in, give it a bang and out plops your snow skin mooncake! If are unable to get cooked glutinous rice flour, you have to cook the uncooked flour yourself, by frying it or using a microwave to do it. I used boiled pandan water to get the fragrance and color for the skin. This can be substituted with any other flavour preferred. The skin actually has a texture identical to the Japanese Mochi.

As for the fillings, I split between mixture of lotus-red bean and durian lotus. Yes, had to make some with the stinky stuff :) No doubt, the durian lovers in the family loved those with durian paste. Stinky and creamy! As for the mixture of lotus and red beans, it blended quite well, maybe we are quite familiar with them as mooncake fillings, besides it gave a multi-color layer effect.

Yes, there will be more to come!

Monday 1 August 2011

Is it time already?


Mooncakes have started to flood the market. Is it time to savour them already?? In fact it's still 1 1/2 months away. This year, Mid-Autumn festival falls on 12 September.

We have the commercial sidelines to thank for giving us a hand in piling up the pounds by bringing them out so early. Coming out with so many new flavours each year, isn't much help too. I guess it's a case of early bird gets the worm for them. I once read that the mooncake festival is the most lucrative of all chinese festivals in our country, with some only in business at this time of the year. By the price of mooncakes these days, it's no brainers. Based on the price list that I have managed to scan through (bakery/restaurant standards) the past few days, it starts at RM50 per box of 4 this year. Unfortunately, it's moving up very steadily and mind you in a pretty steep way too.

Might as well as make my own, making mooncakes are not too difficult. Homemade ones make better gifts too. Although mine may not be so perfect looking, I am sure loved ones and friends will agree that it's the thought the counts, right??

I started off with the traditional baked mooncakes this year. Cheated by making some with store bought red bean paste to kick-off the mooncake making spree :)


The cheat red-bean paste filling mooncake :)


Next came the mixed nuts and fruits, this one genuine homemade fillings. I packed them with assortment of nuts (almond, pistachio, hazel, pecan, seeds (melon, pumpkin, sesame) ) and assortment of dried fruits (kumquat, winter melon, ginger, nutmeg, cranberries, blueberries, mango, coconut, pineapple) This were made for my folks who loved this flavour and they loved mine!

There will be more coming for sure. Different skin, different fillings! Oh, I am so excited!

Share

Twitter Delicious Facebook Digg Stumbleupon Favorites More