Advertisement 300 X 250

Girls' Best Friend

Bright and sparkly. Gemstones came to my mind when I was removing this Dragon Fruit and Orange jelly from the mould. Like a combination of gemstones...rubies, amber and diamonds, all in one!

Dragon's Eyes

The literal translation for the name of a small brown, juicy exotic fruit from the lands of Asia, known as Longan in Chinese, packed into these muffins

Nostalgia

A taste from the humble beginnings, the Long Bean Rice brings back beautiful memories of the yesteryears

Light and Fluffy

Lemon, Yogurt and Cranberries~a nice blend of flavours in a light and fluffy chiffon cake

Bread Stories

Asian style buns ~ Popular as breakfast food or snack, sweet/savoury fillings wrapped in soft, cottony bread

Monday, 20 January 2014

Nian Gao - The Cheater's Way


Nian gao (年糕) is a traditional chinese cake that is mostly eaten during the lunar new year.   Like most food that are eaten during the new year, there is an auspicious meaning to it.  Nian means year in mandarin while gao which means cake also sounds like the word 'high', hence when put together it's a homonym for higher year i.e.  a better year ahead.  And mind you, Nian Gao is also food for the Gods, it is offered to the Kitchen God in hope that he will report only the good seen in the household, some goes to the extent of sticking a piece of the cake on his mouth to ensures this :)

Making the real mc coy is quite an effort as it is steamed over medium heat for at least 2-3 hours.  It takes patience and constant monitoring to ensure water in the steamer doesn't dry out.  I don't think I am up for this yet :)  I shudder to think of the disappointment that i will have to face should it fails after that enormous amount of effort. 

This version that i have here is a baked version that is more popular in the West.  Its preparation is much easier compared to the traditional one.  The recipe was shared by my sister.  It does not taste exactly like the traditional ones but there is some resemblance in terms of texture.  A different type of fragrance altogether with eggs and milk in the recipe.  And since it's bake it has a nice crust on top with some toasted sesame seeds adding to the crunch.    To be fair, me thinks this version of the nian gao should be allowed to bask in its own limelight, it's truly delicious in its own way.

The nian gao is baked in a square pan lined with banana leaves.

I have made this a couple of new years now and it has been quite well received.  I normally serve it as a dessert.


Recipe

Ingredients
  • 4 eggs
  • 3/4 cup oil
  • 1 1/4 cups sugar (mildly sweet, possible to add up 1 1/2 cup if preferred)
  • 2 cups whole milk
  • 450g glutinous rice flour
Method
  1. Prepare a 7 inch square pan.  Line pan with banana leaves (if available).  If banana leaves is not used, pan is to be greased with oil. 
  2. Beat eggs and sugar until pale in color and looks creamy.
  3. Add oil gradually and mix well.
  4. Add milk and flour alternately ending with flour and making sure batter is well mixed.
  5. Sprinkle some toasted sesame seeds for a nutty fragrance and to make it look prettier. 
  6. Bake at 180C for about 1 hour.
I am submitting this post to Aspiring Bakers #39: CNY Rock and Roll! (Jan 2014) hosted by Food Playground 

Thursday, 16 January 2014

Old Time Cookies - La Sam Pia aka Chinese Five Spice Pinwheel Cookie

I am on a roll, after making my first old time cookies for the coming lunar new year, i found myself reminiscing about cookies that we had back then.   

When i was young, making cookies was a family affair,  everyone had a role to play, grandparents, uncles, aunties, cousins and all. My mum would be in charge of baking the more modern ones (i.e. those using butter/margarine and mostly baked) while the more traditional ones like kuih kapit (love letters) which were made over a charcoal stove were done at my grandma's place where there was a bigger space to setup the stove, working area and all.

We made cookies by the tins back then, recycle aluminium tins which were diligently collected, cleaned and stored away months ahead. No where were the plastic jars with red covers that we use nowadays in sight.

Since mum was in charged of the modern ones, we would make them at night in my home during the weekdays and if we were not too tired by the weekend we will join the gang at my grandma's place during the weekends.  Sessions at grandma's were especially fun although making those love letters over a charcoal stove at an average temperature of 32C was no laughing matter.  There were so many of us, chatting, sweating and laughing while carrying out our roles :) Somehow, traditions got lost, probably because there were no longer enough helping hands around after the younger ones grew up and left our hometown.  Reminiscing old times can be emotional at times...

This cookie that i have here is one that my mum used to make. Unique as there's an oriental touch to it.  A combination of sweet, savory and spicy.  I don't remember coming across it elsewhere. It's a little like the another chinese cookie called 'cow ear' biscuit but it's not, taste wise it's not as complex as those.   For ease of reference, i named it Chinese Five Spice cookie although we nicknamed it 'La Sam Pia' which translates to Dirty biscuit in Hokkien within the family! I know, i know, food and dirt are not suppose to go together, lol! If I remember correctly it was  because Big Uncle commented that they look like they had dirt on them because of the brownish wheel in between and the name stuck!  Btw, it's one of Big Uncle's favorite.

Mum has stopped baking cookies for a long time and she couldn't remember the recipe that she had used for it.  I tried making it last year but it didn't turn out quite right, the texture wasn't there.  It's not the buttery, melt in your mouth type of cookie, more like the crunchy and snap type.  I am pretty happy that it turned out quite like the way i remembered it this time.  I can't wait to surprise her with it and bring some for Big Uncle too :)

After comparing a few recipes, i decided to adapt from a checkerboard cookie recipe to recreate this cookie.  The original recipe used cake flour which i substituted to normal All Purpose flour to get the crunch.


Recipe
Adapted from: Do What I Like

Ingredients 
  • 100g butter (room temperature)
  • 70g castor sugar
  • 1/2 tsp vanilla essence
  • 1 egg
Plain dough 
  • 130g all purpose flour
  • 1/4 tsp baking powder
Spice dough 
  • 125g all purpose flour
  • 5g Chinese 5 spice powder
  • 1/2 tsp pepper
  • 1/4 tsp baking powder
Method
  1. Cream butter and sugar till light and fluffy. Then add in vanilla essence and egg and cream till smooth and well combined.
  2. Divide butter mixture into 2 equal portions.
  3. Sift in plain dough into 1 portion of the butter mixture and spice dough into the other portion.
  4. Blend each dough in its mixing bowl till a dough can be formed. 
  5. Cover the dough with cling wrap then roll out each dough into a rectangular shape of 30cm x 20cm. .
  6. Place the 2 doughs on top of the another and roll it up like a swiss roll. Roll tightly to make sure the 2 pieces of dough stick together.  The dough will become a long cylindrical shape of around 5cm in diameter. If the dough is too soft, refrigerate it for 5-10 minutes.
  7. Cut dough into pieces of around 5mm wide.
  8. Bake at 180C for 18 minutes or till the golden brown in colou
I'm submitting this post to the Bake Along event hosted by Zoe of Bake for Happy Kids, Joyce of Kitchen Flavours and Lena of Frozen Wings and the theme is 'Chinese New Year Cookies'.

Photobucket

Monday, 13 January 2014

Old Time Cookies - Hup Tou Sou

Of late I find myself more fascinated with the traditional type of Chinese New Year cookies (the likes of kuih bangkit, pineapple tarts etc) than the modern ones.  Festive seasons have a nostalgic effect on me :)

This one here is the Walnut Cookie also known as Hup Tou Sou (核桃酥) in Cantonese.  It's a Cantonese baby hence the Cantonese name.  I only realised that traditionally these cookies did not have any walnuts in them although they are named such when i started looking for a suitable recipe! Which was surprising, the way i remembered them was they had a very nice nutty aroma in them.   No walnuts, can it be?

So i had to decide whether to go traditional full fletched, with or without walnuts? I decided to go with the walnuts, i figured it could only taste better and not otherwise.

I decided on Lily's recipe, one that she has fine-tuned a couple of times, pretty sure it will be good.  The recipe calls for peanut oil which i didn't have on hand, i went with sunflower instead.  I tweaked the recipe a little, instead of all oil, i rubbed in a little butter and reduce a slight amount of the oil used.  My thoughts were a little butter will make it more fragrant and some melt in your mouth effect.   Verdict? Love it!


As I was preparing this post, it came to my mind that this cookie tasted like one that i used to eat when i was a little girl.  The one that i used to take from a big glass jar with a plastic red cover (i wish i had a photo to show) that was placed atop the cashier counter at my grandmother's kopitiam!   Those cookies were meant for selling but they were not made by grandmother though.   So, i searched further to find out if they are the same cookies.  The moment i saw this post, i knew i was right, they were shaped exactly like the ones that i used to eat except those were much bigger, 3-4 bigger than the ones on the post.   I made another batch shaped exactly like the ones i used to eat as a child just for old times sake...


I am glad i picked this cookie to try.  It brought me back to the times when i had lots of fun with my sister and cousins in my grandma's kopitiam, among them climbing up the cashier counter to get these cookies :)

Recipe

Ingredients 
  • 90 g all-purpose flour 
  • 1/2 tsp baking soda 
  • 1/2 tsp baking powder 
  • a pinch of salt 
  • 40 g confectioners' sugar (reduced to 35g icing sugar)
  • 1/2 cup roasted and ground walnuts 
  • 75 - 80 ml peanut oil (reduced to 50-60ml if butter is used)
  • 15g unsalted butter
 Egg Wash
  • 1 egg yolk plus 1 tbsp water  (milk)
Method 
  1. Sieve flour, baking soda, baking powder, salt and confectioners' sugar. 
  2. Add in the ground walnuts and mix well.
  3. Rub in butter.
  4. Add in peanut oil and knead into a soft dough. 
  5. Divide dough into small portions (I use a melon ball scoop as a gauge but you can just eye ball the size you desire) and roll into a ball.  Flatten ball slightly and arrange them onto lined baking sheets.  (I used about 1 tbsp of dough and shaped it into a ball.  To get one with more edges, use something round and flat to press on the dough)
  6. Glaze cookies with egg wash 
  7. Put to bake in preheated oven 350F for 12 - 15 minutes until golden brown. Baking time defers according to the size of the cookies (Baked at 180C for 18minutes)

I'm submitting this post to the Bake Along event hosted by Zoe of Bake for Happy Kids, Joyce of Kitchen Flavours and Lena of Frozen Wings and the theme is 'Chinese New Year Cookies'.

Photobucket

Saturday, 11 January 2014

Spring is in the Air - 8 Treasure Rice

Spring is in the air!  According to the lunar calendar that is...i know some of you are still bracing one of the harshest winter out there, my thoughts are with you.  The Chinese will be celebrating the beginning of a new lunar year aka the Spring festival on 31st January this year which is in 3 weeks time!


It is the time where family and friends gather and when we gather we feast! And feast in style we do, we give dishes auspicious names in hope that they will bring us luck, fortunes and happiness when eaten :)  May sound humorous to some but it's part of our culture and i find it pretty interesting to know how/why is a particular food considered  auspicious.  

This dish that i have tried out here is a all in one meal.  This recipe by Chris Wan caught my attention in the recent issue of Flavors magazine.  Upon doing a search, i was glad to find that she has included the recipe on her website.   It's auspicious enough to be included in the list for the reunion dinner (the dinner on new year's eve)  but it maybe too much since there will be many other dishes that will go better with white rice instead. Probably consider making it when you need to dish out something quick during one of the days during the festivity especially when all these ingredients are readily available since these are common CNY gifts.  

The name given to this dish is 8 treasure rice.  We Chinese love the number 8 primarily because its pronunciation sounds like 'to prosper'.  And treasures? I don't think it needs any explanation, anyone in the universe would love landing on some treasures.  So, here are the 8 treasures hidden in it and their auspiciousness (hope i am not wrong):-
  • Shitake Mushroom - associated with longevity
  • Dried Oysters - its chinese pronunciation 'hou si' sounds like good events ie symbolizing good events ahead
  • Chinese Sausage - more of a culture to eat cured eat during CNY and perhaps symbolizing a sweet year ahead i guess since its sweet :)
  • Pumpkin - its golden hue for prosperity 
  • Sweet Peas - symbolizing unity  
  • Dried Longan - associated to bringing forth many sons
  • Wolfberries - to sweeten the year ahead
  • Chestnuts - associated to bringing forth many sons (yes, again!)
It's a simple recipe, all you need to do is some simple stir frying then mix them into the rice cooked the way you usually do it be it in a rice cooker or over a stove.  I did mine in a rice cooker.

With such an array of ingredients in it, you can be assured it is going to be delicious.


Recipe
Source: Flavors Magazine Jan 2014, recipe by Chris Wan with some slight variations from me in blue

Ingredients

Condiments A
  • 1 tbsp cooking oil
  • 100g sweet peas
  • 50g wolfberries (wash, soaked for 5 minutes and drained)
Condiments B
  • 100g gingko nuts, boiled for 20 minutes to soften (ready to eat chestnuts)
  • 100g dried oysters, soaked 30 minutes to soften
  • 50g dried mushroom, soaked for 1 hour to soften, then cut into strips
  • 100g dried longans, washed, soaked for 10 minutes to soften and drained, cut into halves
  • 100g bacon, cut into 1.5cm strips (replaced with wax sausage)
  • 200g pumpkin, cut into diced
  • 2 tbsp dried shrimps, washed, soaked for 10 minutes then chopped coarsely
  • Some fried whitebait for garnishing (optional)
  • 2 tsp salt
  • 2 tbsp light soy sauce
  • 20ml water
  • 300g rice (2 cups)
  • 200ml vegetable/chicken stock (enough stock as per instruction on rice cooker for 2 cups of rice)
Method
  1. Heat up oil in a small frying pan then sauté sweet peas with wolfberries for 1 minute.
  2. Remove and set aside.
  3. Heat up another 1 tbsp oil in frying pan then sauté oysters, dried shrimps, mushroom, sausage and pumpkin.
  4. Add in salt, light soy sauce and water.
  5. Simmer for 5 minutes  or until pumpkin is cooked then set aside.
  6. Cook rice in rice cooker.  (Taking a leaf out of the Japanese chestnut rice recipe, I added in chestnut to cook together with the rice).
  7. When stock is fully absorbed, add in condiment A, spread out evenly on top of rice and cook for a further 10 minutes. (Left it for 5 minutes only)
  8. Once rice is cooked, fluff up the rice and mix the ingredients.   (I added in condiments B before mixing up the rice and left everything in the rice cooker for another 5-10 minutes before serving)
  9. Add in condiments B and mix well before serving. (Completed in step 8)
  10. Serve garnish with some fried whitebait.

Thursday, 2 January 2014

Mapo Phai Kuat


Let me make a guess, if you have heard of Mapo Tofu, you must be thinking Mapo what?? after reading the title of this post...Yes, you heard me right, it's Mapo Phai Kuat not Mapo Tofu :)

This is a simple twist of the popular Mapo Tofu dish done with soft bone pork ribs (aka Phai Kuat in Cantonese), the type which i like to use for steaming.   

Ever since trying out the Japanese version of Mapo Tofu recipe that my friend Lena posted when the Asian Food Fest event was featuring Japan, i have fallen in love with the recipe! This Japanese version is slightly milder in terms of the fieriness of a typical Szechuan version and there's a hint of sweetness coming from the use of mirin.  This toned down version suits my son well, making it something everyone in the family can enjoy.  I have cooked it many times.  It's a simple dish, one that can be done in 15 minutes yet very tasty and goes very well with rice.  It taste really delicious especially when you scooped it directly on top of a bowl of piping hot rice as soon as it is ready and start indulging from there on!

So, coming back to Mapo Phai Kuat...while still undecided on how to do my pork ribs,  this mapo tofu recipe came to mind.  And i thought, the mapo tofu sauce should make a great marinade for steaming too. And as they say, the rest is history, that plate of ribs turned out delicious!  I added some soft silken tofu to steam them together with the ribs too.  You won't get that maillard flavors that you will find in mapo tofu but you will get ribs that are just as tasty with the sauce infused into them.  Easy peasy, fast, healthy and tasty, can't ask for more!

Recipe 
Inspired by: Her Frozen Wings with recipe from Just One Cookbook 

Ingredients
  • 2 cloves of garlic, minced
  • 1 tbsp ginger, minced
  • 300 gms soft bone pork ribs
  • 1/2 package silken tofu, slice into medium size pieces
  • 2 stalks green onions, sliced
Marinade 
  • 1 tbsp chilli bean paste ( doubanjiang with chilli)
  • 2 tbsp mirin
  • 1 tbsp miso
  • 1 tbsp oyster sauce
  • 1/2 tbsp soy sauce
Thickening solution
  • 1tsp corn flour
Steps
  1. Mix all the ingredients for the marinade in a bowl.
  2. Mix pork ribs with garlic, ginger and marinade.
  3. Set aside to marinade for 30 minutes.
  4. Before steaming, mix the ribs with a teaspoon of corn flour.
  5. Place ribs and tofu on a steaming dish.
  6. Steam over high heat for 20 minutes until pork ribs are cooked through.
  7. Sprinkle sliced spring onions on top of dish before serving hot.

Tuesday, 31 December 2013

A Turkish Affair


The one food that left a very lasting impression of our holidays in Turkey was rice pilaf.    My son was still very young back then and every time he hit the buffet table, the first thing he would look out for would be rice pilaf, those plain classic ones with orzo.   That alone made him a happy boy for the entire trip.  His love for it was hardly surprising, firstly being Asians we eat a lot of rice and pilaf being rice cooked in seasoned broth brought it a level higher. 

So i decided on a pilaf to lend my support to the Asian Food Fest blogging event which is featuring West Asian food this month.   I chose to make the eggplant pilaf (Patlıcanlı Iç Pilav),  a dish said to have originated from Ottoman palace kitchens.  A hearty and healthy vegan dish that can be eaten on its own.  The soft and creamy eggplants paired very well with the aromatic rice (if you love eggplants that is).   The addition of some Turkish dried apricots (my own twigging since i had some on hand) gave a hint of sweetness to the dish and an added Turkish identity to the dish, if i may say :)

Although the dish can be eaten on its own though, i made a Turkish style grilled chicken dish to accompany it.  A tangy marinade made from a combination of yogurt, lemon juice and spices was used to season the chicken.


So, it was a Turkish affair for my family that night.  I will remember their reactions for sometime now, they were taken by surprise :)  But i would be honest to say i was the only who enjoyed it the most, my boys don't like aubergines/eggplants/brinjal or whatever name you call them and in whatever way you make them, unfortunately!   Actually it was quite funny when they started picking them out from the rice.  But for those who love aubergine, i am pretty sure you will like this dish, so as they say in Turkish,  Afiyet olsun!  


I am submitting this post to Asian Food Fest : West Asia hosted by Shannon of Just As Delish

Signing off for the year with wishes for a very Happy New Year to all my friends out there and 
some memories from my holidays in Turkey for viewing pleasure.  It's a beautiful country, enjoy!

The Blue Mosque

The Ephesus

Cotton Castle 


Fairy Chimneys' Mountains


Recipe - Eggplant Pilaf
Source: Food Thought For who adapted from Ghillie Basan 

Ingredients
  • 1large aubergine/eggplant (3 medium size ones)
  • 1 cup of rice. Long grain is better (2 cups)
  • 1 small onion. Sliced (2 small onions)
  • 2 cloves of garlic. Slivered (4 cloves)
  • 1/2 tsp of sugar (1 tsp)
  • 1/2 tsp of whole cumin (1 tsp cumin powder)
  • 1/2 tsp of whole coriander (1 tsp coriander powder)
  • 2 small tomatoes,  diced (1 large tomato, seeds removed)
  • 2 tsp of tomato paste or puree ( 1 1/2 tbsp tomato puree)
  • 2 cups of water. Lukewarm or at least room temperature. You can use stock as well (Water, as per noted on rice cooker)
  • 6-8 tbsf olive oil. Not extra virgin 
  • Salt and pepper
  • Parsley for garnish, optional 
  • 10 pieces of dried apricot, diced
  • 1/2 cup raisins
Steps
  1. Soak aubergine/eggplant in salted water for at least an hour but no more than three. Drain, squeeze the pieces and dry with paper towels.  Heat  5 tbsf olive oil ( do not sear the oil as the smoke point for olive oil is low) and  gently add the aubergine pieces. After adding in the aubergine, reduce heat, add a tsp or so of olive oil from the top, mix and cover as they fry gently. Check often.    Drain on paper towel and set aside.
  2. Wash and soak rice (if you have the time), skipped. Soften onion and garlic in olive oil. Stir in the sugar, cumin, coriander cooking for a couple of mins. Add the tomato puree and tomatoes. Cook for 3-4 mins. Add the rice. Coat everything. 
  3. Add the water or stock. Season with salt and pepper. Bring to boil. Reduce heat. Cover and simmer. About 20 min. Keep an eye.
  4. When rice is done, mix in the aubergine, apricot and raisins. Leave aside for around 15 minutes for aubergine and fruits to soften slightly.
  5. Garnish with parsley and cubed tomatoes. Serve warm. 
Note: 
  1. My variations are in blue.
  2. The original recipe recommended toasting the spices (cumin/coriander) then ground for best results if used in whole.
  3. I used a rice cooker for step 3.  Simply transfer everything into a rice cooker after step 2 and add in water as per manufacturer's recommendation.

Recipe - Turkish Style Grilled Chicken

Ingredients
  • 2 Tablespoons cumin seeds (1 tbsp cumin powder)
  • 1 small onion, coarsely chopped 
  • 4 to 6 cloves garlic, finely minced (4 cloves garlic)
  • 1 Tablespoon paprika (1/2 tbsp chilli powder)
  • Juice of 1 lemon (1/3 lemon)
  • 1 cup plain yogurt (1/2 cup yogurt)
  • 12 boneless chicken thighs, about 2 to 2-1/2 pounds, or 4 half broilers (8 drumettes) 
  • Salt and freshly ground black pepper
  • Lemon wedges for serving
Steps
  1. Toast the cumin seeds in a small saute pan over medium heat until the seeds are fragrant and start to pop in the pan. Remove from the heat and grind in a spice grinder. 
  2. Place the cumin, onion, garlic, paprika, and lemon juice in a food processor or blender and pulse to liquify. Add the yogurt and pulse just until blended. 
  3. Put the chicken thighs in a shallow non-aluminum baking dish or bowl. Pour the marinade over the chicken and toss well to coat. Let stand at room temperature at least 2 hours or cover and refrigerate overnight.
  4. Remove the chicken from the marinade (discard marinade). 
  5. Place the chicken on a broiler rack and broil until browned on top, about 15 minutes. Reduce oven temperature to 400°F(205°C) and bake until the chicken is juicy and just cooked through, about 15 minutes longer. (Thigh meat will appear dark pink, even when cooked through.) 
  6. Serve immediately.
Note:
  1. My variations in blue.
  2. Skipped step 1 since i substituted with cumin powder.
  3. The chicken pieces didn't turn out pinkish in color, probably because i replaced paprika with chili powder and the amount added was not much to suit my son's acceptance level.

Friday, 20 December 2013

In the Mood for Christmas

Season greetings!  Christmas is just around the corner and the year will be drawing its close already! 

Its been awhile since my last post...i have been hibernating :)  But i am awake now, in time to wish all my friends out there a blessed Christmas and a beautiful new year ahead!  And I am glad that the mood for some festive treats is kicking in!


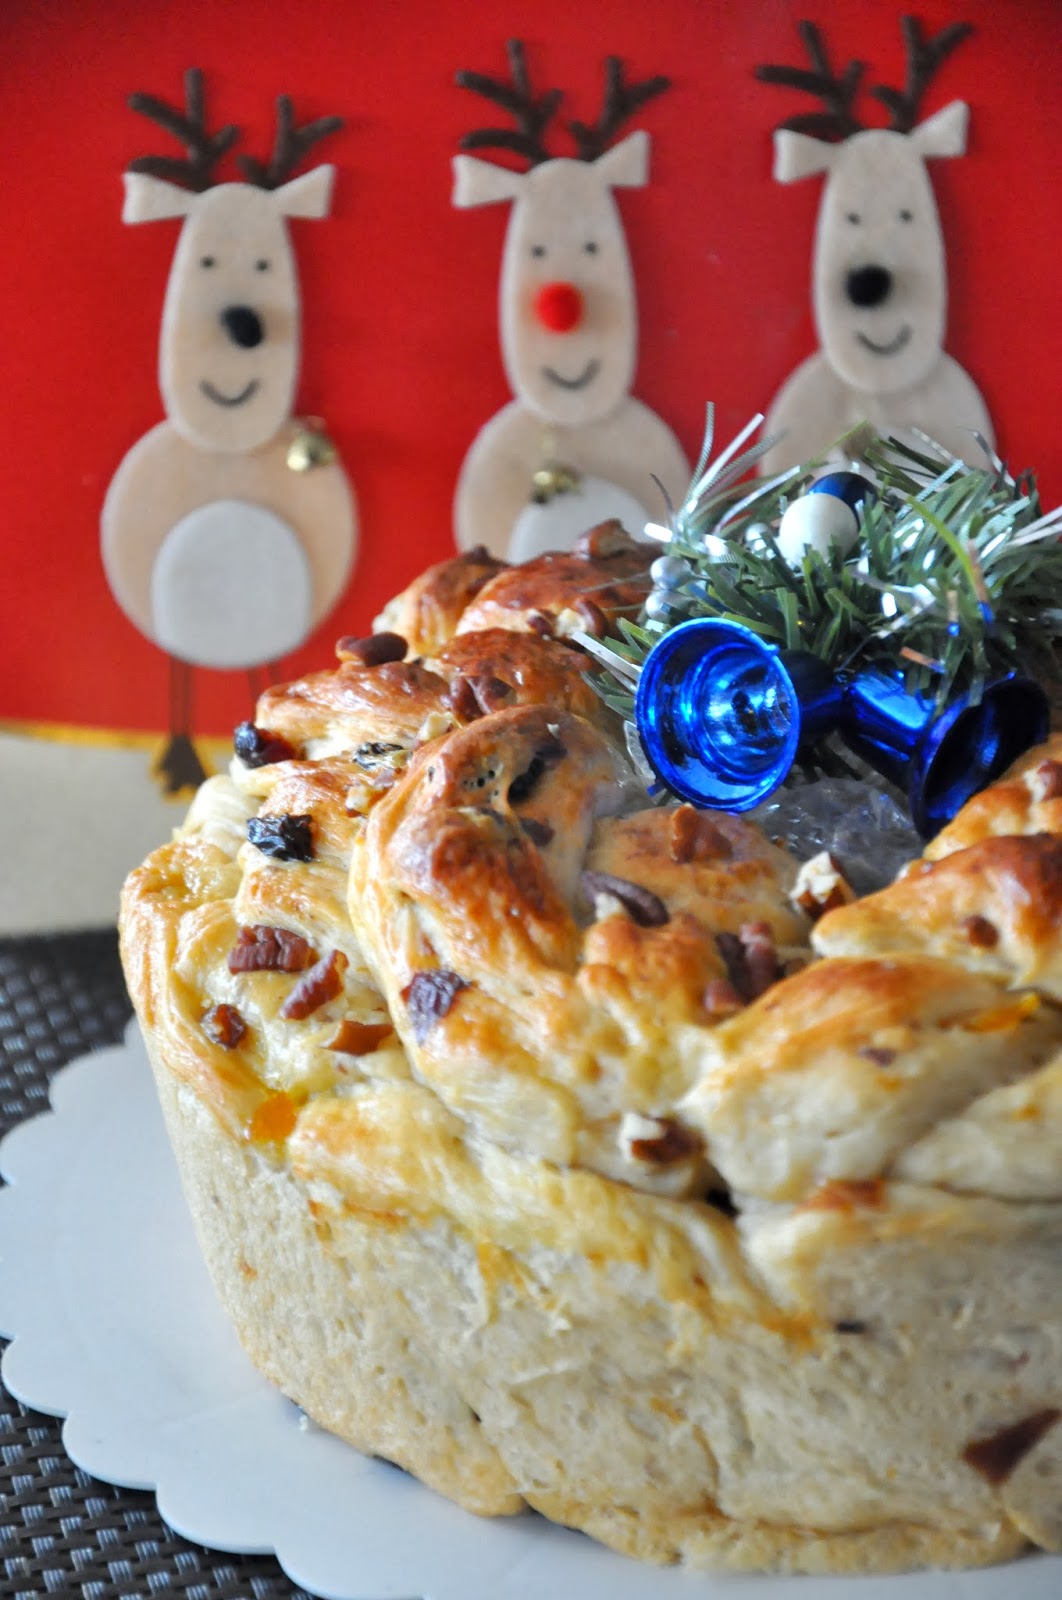
Panettone is a traditional italian christmas bake.  Some say it's the Italian version of a fruit cake since it has in it lots of raisins, dried fruits and candied citrus peel but being yeasted its very much lighter with a soft and fluffy texture.

A classic panettone is tall, cylindrical  and domed shaped. And the dough needs to be proof over a long period of time.

What i have here is a pseudo or simplified version of a Panettone. Not dome shaped for sure, i braided it for the christmas wreath look (i couldn't miss this opportunity to make something that look like a wreath bread) and i didn't follow a classic recipe.

It's tasted good nevertheless, well at least good enough for the family.  The overnight sponge dough method although not as long as proofing the entire dough for 12-15 hours still produced bread that was soft and fluffy.


Recipe
Adapted from recipe for Macadamia Fruity Bread in Magic Bread by Alex Goh

Ingredients
Part A
  • 120g bread flour
  • 85g boiling water
Part B
  • 280g bread flour
  • 60g sugar
  • 3/4 tsp salt
  • 15g milk powder
  • 6g instant yeast
  • Zest from 1 orange (3 tbsp candied kumquat)
Part C
  • 100g cold water
  • 3 egg yolks (1 large egg)
Part D
  • 80g butter
Part E
  • 30g raisins
  • 30g golden raisins (dried apricots)
  • 50g dried cranberries
  • 1 1/2 tbsp grand manier (2 tbsp orange juice)
Step
  1. Premix Part E and set aside for at least 1 hour. (Left it for 4 hours) 
  2. Add boiling water from A into flour, mix until well-blended to form dough.  Cover and set aside to cool.  Keep it in refrigerator for at least 12 hours. (Left it for 6 hours only yet bread turned out well)
  3. Mix B until well blended.  Add in C and knead to form rough dough.  Add in A and knead until well blended.
  4. Add in D and knead to form elastic dough.  Add in E and mix until well-blended. 
  5. Cover the dough with cling film and let it proof until double its original size.  
  6. Punch down dough and let it rest for 10 minutes.
  7. Form dough into a ball and place it in a cake pan.  Let it proof until double its original size.
  8. Bake at 180C for 30 minutes or until golden brown.
Note:
  1. For Step 3 and 4, I used my breadmaker to mix the dough by placing all wet ingredients followed by dry ones and adding in E after the dough has been formed.
  2. I used a 20cm chiffon pan and took out 200g of dough to proof it in 4 cupcake liners  which was meant as a gift for a friend.  The bread would have looked tall enough (i.e. more pannetone like) if the entire dough went into the pan instead.
  3. Instead of forming into a ball (i wanted the top to be christmas wreath like instead of a dome) , i divided the dough into 2 parts then cut 3 stripes out of each part and braided them.  I laid one part on top of one another into the pan.

Merry Christmas and a Blessed New Year to all my friends out there!

I am submitting this to the "Baby Sumo's Christmas Recipes Collection 2013" event which is hosted by Baby Sumo of Eat Your Heart Out.

Share

Twitter Delicious Facebook Digg Stumbleupon Favorites More